2013年5月3日金曜日

[CakePHP]Ajax との連携

  1. script.aculo.us の src 以下にある js ファイルを app/webroot/js にコピーする
  2. prototype.js を app/webroot/js にコピーする
  3. index.ctp の <head> 部に以下を追加
    <?php echo $javascript->link('prototype'); ?>
    <?php echo $javascript->link('scriptaculous'); ?>
  4. index.ctp の <body> 部に以下を追加
        <h1>link</h1>
        <div id="user">
        </div>
        <?php echo $ajax->link('View User',
        array('controller' => 'users', 'action' => 'view', 1),
        array('update' => 'user', 'complete' => 'alert("Hello World")' )
        );
        ?>
  5. views/users/view.ctp を作成
    <!DOCTYPE HTML PUBLIC "-//IETF//DTD HTML//EN">
    <html> <head>
    <meta name="Content-Type" content="text/html; charset=utf-8">
    
    <title></title>
    </head>
    
    <body>
    <h1><?php echo $user['User']['username'] ?></h1>
    <p>
    <small>password: <?php echo $user['User']['password'] ?></small>
    </p>
    
    <p>
    <small>趣味: <?php echo $user['Profile']['hobby'] ?></small>
    </p>
    
    </body> </html>
  6. users_controll.php に以下を追加
    var $helpers = array('Html', 'Javascript', 'Ajax');
    
    function view($id = null)
    {
     $this->User->id = $id;
     $this->set('user', $this->User->read());
    }


Auto complete
  1. script.aculo.us の src 以下にある js ファイルを app/webroot/js にコピーする
  2. prototype.js を app/webroot/js にコピーする
  3. app/views/layouts/ 以下にファイルがないとデフォルトのレイアウトが適用される。デフォルトレイアウトは cake/libs/view/layouts/default.ctp にある。
    ここにある default.ctp を app/views/layouts/ 以下にコピーして以下の箇所を変更する
    <?php
      echo $html->meta('icon');
      echo $html->css('cake.generic');
      echo $scripts_for_layout;
    ?>
  4. prototype.jp と scriptaculous.js を読み込むようにする
    echo $javascript->link('prototype');
    echo $javascript->link('scriptaculous');
  5. charset や html の meta 情報もここで定義されているので各ページには基本的に必要ない。
    index.ctp の <body> 部に以下を追加
    <h1>link</h1>
    <div id="user">
    </div>
    <?php echo $ajax->link('View User',
    array('controller' => 'users', 'action' => 'view', 1),
    array('update' => 'user', 'complete' => 'alert("Hello World")' )
    );
    ?>
    
    <h1>autoComplete</h1>
     <?php echo $form->create('User', array('url' => '/users/index')); ?>
     <?php echo $ajax->autoComplete('User.username', '/users/autoComplete')?>
     <?php echo $form->end('View user')?>
  6. views/users/view.ctp を作成
    <!DOCTYPE HTML PUBLIC "-//IETF//DTD HTML//EN">
    <html> <head>
    <meta name="Content-Type" content="text/html; charset=utf-8">
    
    <title></title>
    </head>
    
    <body>
    <h1><?php echo $user['User']['username'] ?></h1>
    <p>
    <small>password: <?php echo $user['User']['password'] ?></small>
    </p>
    
    <p>
    <small>趣味: <?php echo $user['Profile']['hobby'] ?></small>
    </p>
    
    </body> </html>
  7. views/users/auto_complete.ctp を作成
    <ul>
      <?php foreach($users as $user): ?>
      <li><?php echo $user['User']['username']; ?></li>
      <?php endforeach; ?>
    </ul>
  8. users_controll.php に以下を追加
    var $helpers = array('Html', 'Javascript', 'Ajax');
    
    function view($id = null)
    {
     $this->User->id = $id;
     $this->set('user', $this->User->read());
    }
    
    function autoComplete() {
     $this->set('users', $this->User->find('all', array(
             'conditions' => array(
                'User.username LIKE' => $this->data['User']['username'].'%'
              ),
             'fields' => array('username')
              )));
     $this->layout = 'ajax';
    }
  9. app/webroot/css に my.css を準備して以下を記述する
    div.auto_complete {
     position: absolute;
     width: 250px;
     background-color: white;
     border: 1px solid #888;
     margin: 0px;
     padding: 0px;
    }
    
    li.selected {
     background-color: #ffb;
    }
  10. app/views/layouts/default.ctp に my.css を読み込ませるようにする
    echo $html->css('cake.generic');
    echo $html->css('my');


Selectで選択させて表を切り替える
プルダウンメニューを表示し、選択を切り替えるとそれに該当するユーザのテスト結果のみを表・グラフで表示するようにする。
  1. index.ctp に以下を追加する。
    <?php
     echo $form->create('user_id');
     echo $form->input('user_id', array('options' => array(1, 2, 3)));
     echo $form->end();
    ?>
    <div id="result">ここに結果が</div><br>
    <?php
     echo $ajax->observeField('user_id',
         array(
               'url' => array('action' => 'exam_table_graph'),
               'frequency' => 0.2,
               'update' => 'result'));
    ?>
  2. index.ctp から Ajax 経由で呼び出される exam_table_graph.ctp を準備する。
    <body>
    <table border="1">
      <tr>
        <th>ID</th>
        <th>user_id</th>
        <th>Date</th>
        <th>math</th>
        <th>english</th>
        <th>physics</th>
      </tr>
      <?php
     foreach ($exams as $exam) {
      echo "<tr>\n";
      echo "<td>" . $exam['Exam']['id']; "</td>\n";
      echo "<td>" . $exam['Exam']['user_id']; "</td>\n";
      echo "<td>" . $exam['Exam']['date']; "</td>\n";
      echo "<td>" . $exam['Exam']['math']; "</td>\n";
      echo "<td>" . $exam['Exam']['english']; "</td>\n";
      echo "<td>" . $exam['Exam']['physics']; "</td>\n";
      echo "</tr>\n";
     }
      ?>
    </table>
    
    <?php
      echo '<img src="' . $graph_path . '"><br>';
    ?>
    
    </body>
  3. exams_controller.php に以下を追加する。
    function exam_table_graph() {
     $user_id = $this->data['user_id'] + 1;
     $conditions = array('user_id' => $user_id);
     $order = 'date';
     $exams = $this->Exam->find('all',
           array('conditions' => $conditions,
          'order' => $order));
     $this->set('exams', $exams);
     $graph_path = './exam_graph/' . $user_id;
     $this->set('graph_path', $graph_path);
     Cache::write('exams' . $user_id, $exams);
    }
    
    function exam_graph($id=null) {
     if (!$id) {
      $id = 1;
     }
     $user_id = $id;
    
     /* Cache に保存された値を読み込む */
     $exams = Cache::read('exams' . $user_id);
     if ($exams == false) {
      $conditions = array('user_id' => $user_id);
      $order = 'date';
      $exams = $this->Exam->find('all',
            array('conditions' => $conditions,
           'order' => $order));
     }
     else {
      Cache::delete('exams' . $user_id);
     }
    
     /* pChart を使用する */
     App::import('Vendor', 'pchart/pdata');
     App::import('Vendor', 'pchart/pchart');
    
     $font_path = "c:\Windows\Fonts\sazanami-gothic.ttf";
    
     $y1data = array();
     $a = array();
    
     foreach ($exams as $exam) {
      array_push($y1data, $exam['Exam']['math']);
      array_push($a, $exam['Exam']['date']);
     }
    
     $data = new pData;
     $data->AddPoint($y1data, "math");
     $data->AddPoint($a, "date");
     $data->AddSerie("math");
     $data->SetAbsciseLabelSerie("date");
     $data->SetSerieName("数学", "math");
    
     $chart = new pChart(400, 230);
     $chart->setFontProperties($font_path,8);
     $chart->setGraphArea(50, 30, 380, 200);
    
     /* グラフに背景色をつける */
     $chart->drawFilledRoundedRectangle(7,7,393,223,5,240,240,240);
    
     /* グラフ背景に縁をつける */
     $chart->drawRoundedRectangle(5,5,395,225,5,230,230,230);
    
     /* グラフ領域に背景色をつける */
     $chart->drawGraphArea(255,255,255,TRUE);
    
     $chart->drawScale($data->GetData(),$data->GetDataDescription(),SCALE_START0,150,150,150,TRUE,0,2,TRUE);
    
     /* グリッド線を表示する */
     $chart->drawGrid(4,TRUE,230,230,230,50);
    
     /* chart に data を配置しグラフを描く */
     /* 棒グラフの場合は drawBarGraph */
     $chart->drawBarGraph($data->GetData(), $data->GetDataDescription(), TRUE);
    
     /* 凡例を追加する */
     $chart->setFontProperties($font_path,8);
     $chart->drawLegend(596,150,$data->GetDataDescription(),255,255,255);
    
     /* グラフタイトルを追加する */
     $chart->setFontProperties($font_path,10);
     $chart->drawTitle(50,22,"数学のテスト結果",50,50,50,585);
    
     /* 画像として出力する */
     $chart->Stroke();
    }


プルダウンメニューで表示する内容を変更する
  1. exams テーブルに以下のデータが入っているとする。 Table: exams テーブル
    iduser_iddatemathenglishphysics
    112008-10-01493656
    222008-10-01454842
    332008-10-01728091
    2132008-12-158600
    2022008-12-153000
    1912008-12-154900
    2432009-03-186300
    2322009-03-185400
    2212009-03-188900
  2. ajax ヘルパーの observeField() メソッドを使用することで user_id のプルダウンメニューを定期的に監視し、変化があった時に exam_table が呼び出される。
  3. exam_table では $this->data を使用してフォームに入力された user_id の値を取得し、該当する user_id のデータのみを返すようにできる。
  4. views/exams/index.ctp に以下を記述
    <?php
     echo $form->create('user_id');
     echo $form->input('user_id', array('options' => array(1, 2, 3)));
     echo $form->end();
    ?>
    <div id="result">ここに結果が</div>
    <?php
     echo $ajax->observeField('user_id',
         array(
               'url' => array('action' => 'exam_table'),
               'frequency' => 0.2,
               'update' => 'result'));
    ?>
  5. views/exams/exams_table.ctp を追加
    <body>
    <table border="1">
      <tr>
        <th>ID</th>
        <th>user_id</th>
        <th>Date</th>
        <th>math</th>
        <th>english</th>
        <th>physics</th>
      </tr>
      <?php
     foreach ($exams as $exam) {
      echo "<tr>\n";
      echo "<td>" . $exam['Exam']['id']; "</td>\n";
      echo "<td>" . $exam['Exam']['user_id']; "</td>\n";
      echo "<td>" . $exam['Exam']['date']; "</td>\n";
      echo "<td>" . $exam['Exam']['math']; "</td>\n";
      echo "<td>" . $exam['Exam']['english']; "</td>\n";
      echo "<td>" . $exam['Exam']['physics']; "</td>\n";
      echo "</tr>\n";
     }
      ?>
    </table>
    </body>
  6. controllers/exams_controller.php に以下を追加
    function exam_table() {
     $conditions = array('user_id' => $this->data['user_id'] + 1);
     $order = 'date';
     $exams = $this->Exam->find('all',
           array('conditions' => $conditions,
          'order' => $order));
     $this->set('exams', $exams);
    }
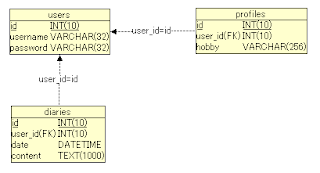
[CakePHP]基本

CakePHPの基本構成
CakePHPはModel, Controller, Viewの3要素から構成される。
  • Database
    データベースのテーブル名は複数形で定義する。例えばユーザ情報を保持するデータベースであればusersと複数形にする。
  • Model
    /app/models/以下に単数形で定義ファイルを置く。先ほどのusersテーブルに対する定義は/app/models/user.phpに記述する。ファイル名は単数形であることに注意。
    class User extends AppModel
    
  • Controller
    /app/controllers/以下に複数形+_controllerという定義ファイルを置く。usersテーブルに対するコントローラは/app/controllers/users_controller.phpとファイル名が複数形になることに注意。
    class UsersController extends AppController
    
  • View
    /app/views/以下に複数形のディレクトリを作成し、controllerが処理するための入り口ページを置く。先ほどのusers_controller.phpにindexページから入った時の処理を記述してあるならば、/app/views/users/index.ctpというファイルを置く。views下のディレクトリ名が複数形であることに注意。
以上の設定をしてブラウザから/app/users/にアクセスするとUsersで定義したページが見られるようになる。
見た目はviews以下のindex.ctpに従う
表示されるデータはcontrollers以下のusers_controller.phpに従う

データベースアクセスのための基本
データベースのテーブル1つに対してModelが1つ対応する
テーブル名は複数形で付け、idというprimary, auto_incrementのフィールドを準備する


Table: CakePHP の要素
Databaseusersprofilesdiaries
ModelUserProfileDiary
ControllerUsersControllerProfilesControllerDiariesController
Viewapp/views/users/index.ctpapp/views/profiles/index.ctpapp/views/diaries/index.ctp

Table: usersテーブル
idINT(10)Primary key, auto_increment
usernameVARCHAR(32)
passwordVARCHAR(32)
Table: profilesテーブル
idINT(10)Primary key, auto_increment
user_idINT(10)users.idへの外部キー
hobbyVARCHAR(256)
Table: diariesテーブル
idINT(10)Primary key, auto_increment
user_idINT(10)users.idへの外部キー
dateDATETIME
contentTEXT(1000)
  • アソシエーションを定義する
    • アソシエーションによりデータベーステーブルに定義した外部キーを使用してテーブル間のリレーションを構築できる。
      usersにはprofilesが1つとdiariesが複数ぶら下がる構成とする場合models/user.phpに$hasOneと$hasManyを定義する。
      データベースの命名規則がCakePHPのものに従っていればこれだけでOK。
      <?php
      class User extends AppModel
      {
       var $name = 'User';
       var $hasOne = 'Profile';
       var $hasMany = 'Diary';
      }
      ?>
    • 続いてprofilesはusersにぶら下がっている(属している)ことを定義する。
      models/profile.phpに$belongsToを記述する。
      <?php
      class Profile extends AppModel
      {
       var $name = 'Profile';
       var $belongsTo = 'User';
      }
      ?>
    • 同様にdiariesはusersにぶら下がっている(属している)ことを定義する。
      models/diary.phpに$belongsToを記述する。
      <?php
      class Diary extends AppModel
      {
       var $name = 'Diary';
       var $belongsTo = 'User';
      }
      ?>


デバッグ
views/users/index.ctp内に
<?php debug($user, $showHTML=true, $showForm=false); ?>
と書くと以下のように表示してくれる。
Array
(
    [0] => Array
    (
        [User] => Array
            (
                [id] => 1
                [username] => user1
                [password] => password1
            )

        [Profile] => Array
            (
                [id] => 1
                [user_id] => 1
                [hobby] => 読書
            )

        [Diary] => Array
            (
                [0] => Array
                    (
                        [id] => 1
                        [user_id] => 1
                        [date] => 2009-02-20 14:22:06
                        [content] => テストです。
                    )
            )
    )

    [1] => Array
    (
        [User] => Array
            (
                [id] => 2
                [username] => user2
                [password] => password2
            )

        [Profile] => Array
            (
                [id] => 2
                [user_id] => 2
                [hobby] => 映画鑑賞
            )

        [Diary] => Array
            (
                [0] => Array
                    (
                        [id] => 2
                        [user_id] => 2
                        [date] => 2009-02-19 14:22:17
                        [content] => はじめまして
                    )

                [1] => Array
                    (
                        [id] => 3
                        [user_id] => 2
                        [date] => 2009-02-20 14:37:30
                        [content] => 2度目の更新です。
                    )

                [2] => Array
                    (
                        [id] => 4
                        [user_id] => 2
                        [date] => 2009-02-21 14:37:45
                        [content] => 明日の予定は・・・
                    )
            )
    )
)

[Linux]USB バスの接続状態を確認

USB バスに接続されている状態を確認
$ lsusb
Bus 001 Device 001: ID 1d6b:0002 Linux Foundation 2.0 root hub
Bus 002 Device 001: ID 1d6b:0001 Linux Foundation 1.1 root hub
Bus 003 Device 001: ID 1d6b:0001 Linux Foundation 1.1 root hub
Bus 004 Device 001: ID 1d6b:0001 Linux Foundation 1.1 root hub
Bus 005 Device 001: ID 1d6b:0001 Linux Foundation 1.1 root hub
Bus 001 Device 003: ID 2019:ab2a PLANEX
Bus 002 Device 002: ID 045e:00e1 Microsoft Corp. Wireless Laser Mouse 6000 Reciever

詳細表示
Bus と Devie No. を指定して詳細を表示
$ sudo lsusb -vs 001:003

Bus 001 Device 003: ID 2019:ab2a PLANEX 
Device Descriptor:
  bLength                18
  bDescriptorType         1
  bcdUSB               2.00
  bDeviceClass            0 (Defined at Interface level)
  bDeviceSubClass         0 
  bDeviceProtocol         0 
  bMaxPacketSize0        64
  idVendor           0x2019 PLANEX
  idProduct          0xab2a 
  bcdDevice            2.00
  iManufacturer           1 Planex Communications Inc.
  iProduct                2 GW-USNano2
  iSerial                 3 00e04c000001
  bNumConfigurations      1
  Configuration Descriptor:
    bLength                 9
    bDescriptorType         2
    wuTotalLength           46
    bNumInterfaces          1
    bConfigurationValue     1
    iConfiguration          0 
    bmAttributes         0x80
      (Bus Powered)
    MaxPower              500mA
    Interface Descriptor:
      bLength                 9
      bDescriptorType         4
      bInterfaceNumber        0
      bAlternateSetting       0
      bNumEndpoints           4
      bInterfaceClass       255 Vendor Specific Class
      bInterfaceSubClass    255 Vendor Specific Subclass
      bInterfaceProtocol    255 Vendor Specific Protocol
      iInterface              0 
      Endpoint Descriptor:
        bLength                 7
        bDescriptorType         5
        bEndpointAddress     0x81  EP 1 IN
        bmAttributes            2
          Transfer Type            Bulk
          Synch Type               None
          Usage Type               Data
        wMaxPacketSize     0x0200  1x 512 bytes
        bInterval               0
      Endpoint Descriptor:
        bLength                 7
        bDescriptorType         5
        bEndpointAddress     0x02  EP 2 OUT
        bmAttributes            2
          Transfer Type            Bulk
          Synch Type               None
          Usage Type               Data
        wMaxPacketSize     0x0200  1x 512 bytes
        bInterval               0
      Endpoint Descriptor:
        bLength                 7
        bDescriptorType         5
        bEndpointAddress     0x03  EP 3 OUT
        bmAttributes            2
          Transfer Type            Bulk
          Synch Type               None
          Usage Type               Data
        wMaxPacketSize     0x0200  1x 512 bytes
        bInterval               0
      Endpoint Descriptor:
        bLength                 7
        bDescriptorType         5
        bEndpointAddress     0x84  EP 4 IN
        bmAttributes            3
          Transfer Type            Interrupt
          Synch Type               None
          Usage Type               Data
        wMaxPacketSize     0x0040  1x 64 bytes
        bInterval               1
Device Qualifier (for other device speed):
  bLength                10
  bDescriptorType         6
  bcdUSB               2.00
  bDeviceClass            0 (Defined at Interface level)
  bDeviceSubClass         0 
  bDeviceProtocol         0 
  bMaxPacketSize0        64
  bNumConfigurations      1
Device Status:     0x0000
  (Bus Powered)

使用ドライバー確認
lsusb -t で各デバイスにどのドライバーが使用されていることが確認できる
$ lsusb -t
/:  Bus 05.Port 1: Dev 1, Class=root_hub, Driver=uhci_hcd/2p, 12M
/:  Bus 04.Port 1: Dev 1, Class=root_hub, Driver=uhci_hcd/2p, 12M
/:  Bus 03.Port 1: Dev 1, Class=root_hub, Driver=uhci_hcd/2p, 12M
/:  Bus 02.Port 1: Dev 1, Class=root_hub, Driver=uhci_hcd/2p, 12M
    |__ Port 1: Dev 2, If 0, Class=HID, Driver=usbhid, 1.5M
/:  Bus 01.Port 1: Dev 1, Class=root_hub, Driver=ehci_hcd/8p, 480M
    |__ Port 8: Dev 3, If 0, Class=vend., Driver=rtl8192cu, 480M

2013年4月29日月曜日

[C言語]semaphore

複数のスレッドを生成した場合に semaphore を使用して動作の順番を制御する。
#include <stdio.h>
#include <pthread.h>
#include <semaphore.h>

#define USE_SEMAPHORE 1
sem_t sem;

void *thread_func(void *param)
{
 int pid;
 int i;
 pthread_t thread_id;

#if USE_SEMAPHORE
 sem_wait(&sem);
#endif
 thread_id = pthread_self();
 printf("%s called\n", __FUNCTION__);
 printf("  thread ID = %ld\n", thread_id);
 printf("  2:pid = %d\n", pid);
 pid = getpid();
 sleep(5);
 printf("  done\n");
#if USE_SEMAPHORE
 sem_post(&sem);
#endif
}

#define THREAD_NUM_MAX 3
int main(void)
{
 pthread_t t[THREAD_NUM_MAX];
 int pid;
 int i;

#if USE_SEMAPHORE
 sem_init(&sem, 0, 1);
#endif

 pid = getpid();
 printf("1:pid = %d\n", pid);
 for (i = 0; i < THREAD_NUM_MAX; i++) {
  if (pthread_create(&t[i], NULL, thread_func, NULL) != 0) {
   printf("Failed pthread_create()\n");
   return -1;
  }
  printf("Next line of pthread_create() called. thead ID[%d] = %ld\n", i, t[i]);
 }

 for (i = 0; i < THREAD_NUM_MAX; i++) {
  pthread_join(t[i], NULL);
 }

#if USE_SEMAPHORE
 sem_destroy(&sem);
#endif

 printf("End of the program\n");

 return 0;
}
USE_SEMAPHORE を 0 にして semaphore を使用しなかった場合の出力結果
1:pid = 920
Next line of pthread_create() called. thead ID[0] = 7078224
thread_func called
  thread ID = 7078224
  2:pid = 7078224
thread_func called
Next line of pthread_create() called. thead ID[1] = 7078408
  thread ID = 7078408
  2:pid = 7078408
thread_func called
  thread ID = 7078544
  2:pid = 7078544
Next line of pthread_create() called. thead ID[2] = 7078544
  done
  done
  done
End of the program
3 つの子スレッドが同時に動作しているので全て sleep(5) を完了させて同時に終わる。
よって time コマンドでプログラムの実行時間を計測すると以下のように約 5 秒で終了している。
real    0m5.156s
user    0m0.405s
sys     0m0.015s
USE_SEMAPHORE を 1 にして semaphore を使用した場合の出力結果
1:pid = 1212
Next line of pthread_create() called. thead ID[0] = 7078256
thread_func called
  thread ID = 7078256
  2:pid = 7078256
Next line of pthread_create() called. thead ID[1] = 7078440
Next line of pthread_create() called. thead ID[2] = 7078576
  done
thread_func called
  thread ID = 7078440
  2:pid = 7078440
  done
thread_func called
  thread ID = 7078576
  2:pid = 7078576
  done
End of the program
1 つの semaphore を順番に取得 (wait/post) して動作しているので、3 つの子スレッドが順番に動作している。
time コマンドで実行時間を計測すると以下のように約 15 秒かかる。
real    0m15.203s
user    0m0.155s
sys     0m0.015s

[C言語]pthread

thread プログラム
#include <stdio.h>
#include <pthread.h>

void *thread_func(void *param)
{
 int pid;
 int i;
 pthread_t thread_id;

 thread_id = pthread_self();
 printf("%s called\n", __FUNCTION__);
 printf("  thread ID = %ld\n", thread_id);
 printf("  2:pid = %d\n", pid);
 pid = getpid();
 sleep(5);
 printf("  done\n");
}

int main(void)
{
 pthread_t thread;
 int pid;

 pid = getpid();
 printf("1:pid = %d\n", pid);
 if (pthread_create(&thread, NULL, thread_func, NULL) != 0) {
  printf("Failed pthread_create()\n");
  return -1;
 }
 printf("Next line of pthread_create() called. thead ID = %ld\n", thread);
 pthread_join(thread, NULL);

 printf("End of the program\n");

 return 0;
}
出力結果
1:pid = 4780
Next line of pthread_create() called. thead ID = 7078224
thread_func called
  thread ID = 7078224
  2:pid = 7078224
  done
End of the program
main() 関数から pthread_create() により thread_func が別スレッドとして生成される。
親スレッドは pthread_join() で子スレッドが終了してくるのを待つ。

[C言語]Queue

C での queue の使い方 (sys/queue.h)
#include <stdio.h>
#include <string.h>
#include <stdlib.h>
#include <sys/queue.h>

struct entry {
 int id;
 TAILQ_ENTRY(entry) entries;
};

int main(void)
{
 int i;
 struct entry *t, *p;
 TAILQ_HEAD(tailhead, entry) head;
 struct tailhead *headp;
 TAILQ_INIT(&head);

 for (i = 0; i < 10; i++) {
  t = (struct entry*)malloc(sizeof(struct entry));
  memset(t, 0, sizeof(t));
  t->id = i;
  TAILQ_INSERT_TAIL(&head, t, entries);
 }

 for (p = head.tqh_first; p != NULL; p = p->entries.tqe_next) {
  printf("%08x %d\n", p, p->id);
 }

 t = (struct entry*)malloc(sizeof(struct entry));
 memset(t, 0, sizeof(t));
 t->id = 100;

 printf("Push new entry after 4th element\n");
 p = head.tqh_first;
 for (i = 0; i < 3; i++) {
  p = p->entries.tqe_next;
 }
 TAILQ_INSERT_AFTER(&head, p, t, entries);

 for (p = head.tqh_first; p != NULL; p = p->entries.tqe_next) {
  printf("%08x %d\n", p, p->id);
 }

 printf("Pop head entry\n");
 TAILQ_REMOVE(&head, head.tqh_first, entries);

 for (p = head.tqh_first; p != NULL; p = p->entries.tqe_next) {
  printf("%08x %d\n", p, p->id);
 }

 return 0;
}
実行結果
>queue.exe
006b2580 0
006b2590 1
006b25a0 2
006b25b0 3
006b25c0 4
006b25d0 5
006b25e0 6
006b25f0 7
006b2600 8
006b2610 9
Push new entry after 4th element
006b2580 0
006b2590 1
006b25a0 2
006b25b0 3
006c2628 100
006b25c0 4
006b25d0 5
006b25e0 6
006b25f0 7
006b2600 8
006b2610 9
Pop head entry
006b2590 1
006b25a0 2
006b25b0 3
006c2628 100
006b25c0 4
006b25d0 5
006b25e0 6
006b25f0 7
006b2600 8
006b2610 9

C++ での queue class の使い方 (queue)
#include <iostream>
#include <queue>
using namespace std;

int main(void)
{
 int i;
 queue<int> que;

 for (i = 0; i < 10; i++) {
  que.push(i);
 }

 cout << "size=" << que.size() << endl;

 while (!que.empty()) {
  cout << que.front() << " ";
  que.pop();
 }
 cout << endl;

 return 0;
}
実行結果
>queue2.exe
size=10
0 1 2 3 4 5 6 7 8 9

[SELinux]SELinux を無効にする

テスト環境で Linux を使用している場合、SELinux がブロックすることで通信できないことが多々ある。テストで使用しているだけなので SELinux をとりあえず無効にしておく。
Example: /etc/selinux/config
# This file controls the state of SELinux on the system.
# SELINUX= can take one of these three values:
#       enforcing - SELinux security policy is enforced.
#       permissive - SELinux prints warnings instead of enforcing.
#       disabled - SELinux is fully disabled.
SELINUX=enforcing
# SELINUXTYPE= type of policy in use. Possible values are:
#       targeted - Only targeted network daemons are protected.
#       strict - Full SELinux protection.
SELINUXTYPE=targeted
SELINUX=enforcing を SELINUX=disabled とすることで無効になる。