$ret = App:import('Vendor', 'geshi/geshi');
var_dump($ret);
として返値を見ることでロードが正常にできているか確認できる。
2013年5月3日金曜日
[CakePHP]CkaePHP App::import() の返値
必要なPluginを app/venders の下に置く

[CakePHP]add フォームを追加できるページ
/app/views/exams/multi_add.ctp を準備し、<body> 部に以下を記述する。
<div id="add">
</div>
<a href="/php/cake/exams/add" id="link1262083738" onclick=" event.returnValue = false; return false;">Add exam score</a>
<script type="text/javascript">
//<![CDATA[
Event.observe('link1262083738', 'click', function(event) {
 new Ajax.Updater('add','/php/cake/exams/add', {
  asynchronous:true,
  evalScripts:true,
  insertion: Insertion.Top,
  requestHeaders:['X-Update', 'add']
  })
 }, false);
//]]>
</script>
通常は ajax ヘルパーの $ajax->link() を使用すれば add.ctp を <div id="add"> に追加表示することができるが、そのままでは 1 つ分のフォームしか表示できないので自前で Ajax.Updater を書き、オプションに insertion: Insertion.Top を追加することでリンクをクリックする度にフォームが追加されるようにしてみた。
[CakePHP]データ追加ページ
/app/views/exams/add.ctp というページを準備し、<body> 部に以下を記述する。
<?php
echo $form->create('Exam');
echo $form->input('user_id');
echo $form->input('date');
echo $form->input('math');
echo $form->input('english');
echo $form->input('physics');
echo $form->end('Save');
?>
/app/controllers/exams_controller.php を準備し、以下を記述する。
<?
class ExamsController extends AppController
{
 var $name = 'Exams';
 var $uses = array('User', 'Exam');
 var $helpers = array('Html', 'Javascript', 'Ajax');

 function index() {
  $this->set('exams', $this->Exam->find('all'));
 }

 function add() {
  $fields = 'username';
  $users = $this->Exam->User->find('list', array('fields' => $fields));
  $this->set('users', $users);
  if (!empty($this->data)) {
   debug($this->data);

   if ($this->Exam->save($this->data)) {
    $this->flash('Your post has been saved.' , '/examss');
   }
  }
 }
}
?>
$users を view の add.ctp に渡してやることで user_id の部分を user テーブルにある username と紐付けて表示することができる。
[CakePHP]App::import の注意点
モジュール名はすべて小文字で書かないと読み込んでもらえない。
ファイルの実体が app/venders/pcahrt/pData.php であっても pchart/pdata で import しなければならない。
ファイルの実体が app/venders/pcahrt/pData.php であっても pchart/pdata で import しなければならない。
App::import('Vendor', 'pchart/pdata');
App::import('Vendor', 'pchart/pchart');
[CakePHP]Database
Cache を利用して DB へのアクセスを減らす
Table: exams テーブル
上記の exams テーブルにアクセスして表を作成し、さらにそのデータから JpGraph でグラフを作成する場合 ExamsController に表を作成するための関数をグラフを作成するための関数を準備する必要がある。
Table: exams テーブル
| id | user_id | math | english | physics |
| 1 | 1 | 49 | 36 | 56 |
| 2 | 2 | 45 | 48 | 42 |
| 3 | 3 | 72 | 80 | 91 |
function exam_total() {
 $users = $this->User->find('all');
 foreach ($users as $user) {
  $total[$user['User']['id']] = 0;
  $total[$user['User']['id']] = $user['Exam']['math'] + $user['Exam']['english'] + $user['Exam']['physics'];
 }
 $this->set('users', $users);
 $this->set('total', $total);
 $this->set('graph_path', './exam_total_graph');
}

function exam_total_graph() {
 /* JpGraph を使用する */
 App::import('Vendor', 'jpgraph/jpgraph');
 App::import('Vendor', 'jpgraph/jpgraph_bar');

 /* DB から値を取得 */
 $users = $this->User->find('all');

 $y1data = array();
 $y2data = array();
 $zerodata = array();

 $a = array();

 /* 合計計算 */
 foreach ($users as $user) {
  $total = 0;
  $total = $user['Exam']['math'] + $user['Exam']['english'] + $user['Exam']['physics'];

  array_push($y1data, $user['Exam']['math']);
  array_push($y2data, $total);
  array_push($zerodata, 0);
  array_push($a, $user['User']['username']);
 }

 /* グラフ作成 */
 $graph = new Graph(350, 250, "auto");
 $graph->SetScale("textlin", 0, 100);
 $graph->SetY2Scale("lin", 0, 300);
 /* 右側の Y 軸で値が全部表示できないのでグラフを表示する場所の
  * margin を指定する
  */
 $graph->img->SetMargin(30, 30, 30, 30);

 /* X軸項目追加 */
 $graph->xaxis->SetTickLabels($a);

 /* plot作成 */
 $bplot1 = new BarPlot($y1data);
 $bplot1->value->Show();
 $bplot1->value->SetFormat('%d');

 $bplot2 = new BarPlot($y2data);
 $bplot2->value->Show();
 $bplot2->value->SetFormat('%d');

 /* 単純に bplot1, bplot2 を表示するとグラフが重なってしまうので
  * $zerodata のダミーを間に挟んでグループ化して
  * bplot1, bplot2 が並んでいるように表示する
  */
 $bplotzero = new BarPlot($zerodata);
 $bgplot1 = new GroupBarPlot(array($bplot1, $bplotzero));
 $bgplot2 = new GroupBarPlot(array($bplotzero, $bplot2));

 /* グラフ上に描画 */
 $graph->Add($bgplot1);
 $graph->AddY2($bgplot2);

 /* グラフ表示 */
 $graph->Stroke();
}
この中で DB にアクセスして値を格納し、各人の合計得点を計算する箇所が重複している
$users = $this->User->find('all');
foreach ($users as $user) {
  $total[$user['User']['id']] = 0;
  $total[$user['User']['id']] = $user['Exam']['math'] + $user['Exam']['english'] + $user['Exam']['physics'];
}
Cache 機能を使うことで DB へのアクセスを減らすことが可能となる。
Cache::read($key, $config = null);
Cache::write($key, $value, $config = null);
Cache::delete($key, $config = null);
- write() で $key に入力した文字列に $value の値を関連付けて保存する。
- read() で $key に関連付けられた値を読み込む。
- delete() で $key の値を cache から削除する。
function exam_total() {
 $users = $this->User->find('all');

 foreach ($users as $user) {
  $total[$user['User']['id']] = 0;
  $total[$user['User']['id']] = $user['Exam']['math'] + $user['Exam']['english'] + $user['Exam']['physics'];
 }

 $this->set('users', $users);
 $this->set('total', $total);
 Cache::write('users', $users);
 Cache::write('total', $total);
}

function exam_total_graph() {
 /* JpGraph を使用する */
 App::import('Vendor', 'jpgraph/jpgraph');
 App::import('Vendor', 'jpgraph/jpgraph_bar');

 /* Cache に保存された値を読み込む */
 $users = Cache::read('users');
 $total = Cache::read('total');

 Cache::delete('users');
 Cache::delete('total');

 $y1data = array();
 $y2data = array();
 $zerodata = array();
 $a = array();

 foreach ($users as $user) {
  array_push($y1data, $user['Exam']['math']);
  array_push($y2data, $total[$user['User']['id']]);
  array_push($zerodata, 0);
  array_push($a, $user['User']['username']);
 }

 (以下略)
- exam_total() の最後で $users, $total を Cache に保存しておき、exam_total() の後に呼び出される exam_total_graph() では cache のデータを利用するように変更して DB へのアクセス回数を減らすことができる。
- Cache::write() により app/tmp/cache 以下に cake_total, cake_users というファイルが生成される。これを exam_total_graph() 関数で Cache::read() により読み出し、読み出し後は Cache::delete() で削除する。
[CakePHP]Ajax との連携
- script.aculo.us の src 以下にある js ファイルを app/webroot/js にコピーする
- prototype.js を app/webroot/js にコピーする
- index.ctp の <head> 部に以下を追加
<?php echo $javascript->link('prototype'); ?> <?php echo $javascript->link('scriptaculous'); ?> - index.ctp の <body> 部に以下を追加
<h1>link</h1> <div id="user"> </div> <?php echo $ajax->link('View User', array('controller' => 'users', 'action' => 'view', 1), array('update' => 'user', 'complete' => 'alert("Hello World")' ) ); ?> - views/users/view.ctp を作成
<!DOCTYPE HTML PUBLIC "-//IETF//DTD HTML//EN">
<html> <head>
<meta name="Content-Type" content="text/html; charset=utf-8">

<title></title>
</head>

<body>
<h1><?php echo $user['User']['username'] ?></h1>
<p>
<small>password: <?php echo $user['User']['password'] ?></small>
</p>

<p>
<small>趣味: <?php echo $user['Profile']['hobby'] ?></small>
</p>

</body> </html>
- users_controll.php に以下を追加
var $helpers = array('Html', 'Javascript', 'Ajax');

function view($id = null)
{
 $this->User->id = $id;
 $this->set('user', $this->User->read());
}
Auto complete
- script.aculo.us の src 以下にある js ファイルを app/webroot/js にコピーする
- prototype.js を app/webroot/js にコピーする
- app/views/layouts/ 以下にファイルがないとデフォルトのレイアウトが適用される。デフォルトレイアウトは cake/libs/view/layouts/default.ctp にある。
ここにある default.ctp を app/views/layouts/ 以下にコピーして以下の箇所を変更する<?php echo $html->meta('icon'); echo $html->css('cake.generic'); echo $scripts_for_layout; ?> - prototype.jp と scriptaculous.js を読み込むようにする
echo $javascript->link('prototype'); echo $javascript->link('scriptaculous'); - charset や html の meta 情報もここで定義されているので各ページには基本的に必要ない。
index.ctp の <body> 部に以下を追加<h1>link</h1> <div id="user"> </div> <?php echo $ajax->link('View User', array('controller' => 'users', 'action' => 'view', 1), array('update' => 'user', 'complete' => 'alert("Hello World")' ) ); ?> <h1>autoComplete</h1> <?php echo $form->create('User', array('url' => '/users/index')); ?> <?php echo $ajax->autoComplete('User.username', '/users/autoComplete')?> <?php echo $form->end('View user')?> - views/users/view.ctp を作成
<!DOCTYPE HTML PUBLIC "-//IETF//DTD HTML//EN">
<html> <head>
<meta name="Content-Type" content="text/html; charset=utf-8">

<title></title>
</head>

<body>
<h1><?php echo $user['User']['username'] ?></h1>
<p>
<small>password: <?php echo $user['User']['password'] ?></small>
</p>

<p>
<small>趣味: <?php echo $user['Profile']['hobby'] ?></small>
</p>

</body> </html>
- views/users/auto_complete.ctp を作成
<ul>
  <?php foreach($users as $user): ?>
  <li><?php echo $user['User']['username']; ?></li>
  <?php endforeach; ?>
</ul>
- users_controll.php に以下を追加
var $helpers = array('Html', 'Javascript', 'Ajax'); function view($id = null) { $this->User->id = $id; $this->set('user', $this->User->read()); } function autoComplete() { $this->set('users', $this->User->find('all', array( 'conditions' => array( 'User.username LIKE' => $this->data['User']['username'].'%' ), 'fields' => array('username') ))); $this->layout = 'ajax'; } - app/webroot/css に my.css を準備して以下を記述する
div.auto_complete { position: absolute; width: 250px; background-color: white; border: 1px solid #888; margin: 0px; padding: 0px; } li.selected { background-color: #ffb; } - app/views/layouts/default.ctp に my.css を読み込ませるようにする
echo $html->css('cake.generic');
echo $html->css('my');
Selectで選択させて表を切り替える
プルダウンメニューを表示し、選択を切り替えるとそれに該当するユーザのテスト結果のみを表・グラフで表示するようにする。
- index.ctp に以下を追加する。
<?php echo $form->create('user_id'); echo $form->input('user_id', array('options' => array(1, 2, 3))); echo $form->end(); ?> <div id="result">ここに結果が</div><br> <?php echo $ajax->observeField('user_id', array( 'url' => array('action' => 'exam_table_graph'), 'frequency' => 0.2, 'update' => 'result')); ?> - index.ctp から Ajax 経由で呼び出される exam_table_graph.ctp を準備する。
<body> <table border="1"> <tr> <th>ID</th> <th>user_id</th> <th>Date</th> <th>math</th> <th>english</th> <th>physics</th> </tr> <?php foreach ($exams as $exam) { echo "<tr>\n"; echo "<td>" . $exam['Exam']['id']; "</td>\n"; echo "<td>" . $exam['Exam']['user_id']; "</td>\n"; echo "<td>" . $exam['Exam']['date']; "</td>\n"; echo "<td>" . $exam['Exam']['math']; "</td>\n"; echo "<td>" . $exam['Exam']['english']; "</td>\n"; echo "<td>" . $exam['Exam']['physics']; "</td>\n"; echo "</tr>\n"; } ?> </table> <?php echo '<img src="' . $graph_path . '"><br>'; ?> </body> - exams_controller.php に以下を追加する。
function exam_table_graph() {
 $user_id = $this->data['user_id'] + 1;
 $conditions = array('user_id' => $user_id);
 $order = 'date';
 $exams = $this->Exam->find('all',
       array('conditions' => $conditions,
      'order' => $order));
 $this->set('exams', $exams);
 $graph_path = './exam_graph/' . $user_id;
 $this->set('graph_path', $graph_path);
 Cache::write('exams' . $user_id, $exams);
}

function exam_graph($id=null) {
 if (!$id) {
  $id = 1;
 }
 $user_id = $id;

 /* Cache に保存された値を読み込む */
 $exams = Cache::read('exams' . $user_id);
 if ($exams == false) {
  $conditions = array('user_id' => $user_id);
  $order = 'date';
  $exams = $this->Exam->find('all',
        array('conditions' => $conditions,
       'order' => $order));
 }
 else {
  Cache::delete('exams' . $user_id);
 }

 /* pChart を使用する */
 App::import('Vendor', 'pchart/pdata');
 App::import('Vendor', 'pchart/pchart');

 $font_path = "c:\Windows\Fonts\sazanami-gothic.ttf";

 $y1data = array();
 $a = array();

 foreach ($exams as $exam) {
  array_push($y1data, $exam['Exam']['math']);
  array_push($a, $exam['Exam']['date']);
 }

 $data = new pData;
 $data->AddPoint($y1data, "math");
 $data->AddPoint($a, "date");
 $data->AddSerie("math");
 $data->SetAbsciseLabelSerie("date");
 $data->SetSerieName("数学", "math");

 $chart = new pChart(400, 230);
 $chart->setFontProperties($font_path,8);
 $chart->setGraphArea(50, 30, 380, 200);

 /* グラフに背景色をつける */
 $chart->drawFilledRoundedRectangle(7,7,393,223,5,240,240,240);

 /* グラフ背景に縁をつける */
 $chart->drawRoundedRectangle(5,5,395,225,5,230,230,230);

 /* グラフ領域に背景色をつける */
 $chart->drawGraphArea(255,255,255,TRUE);

 $chart->drawScale($data->GetData(),$data->GetDataDescription(),SCALE_START0,150,150,150,TRUE,0,2,TRUE);

 /* グリッド線を表示する */
 $chart->drawGrid(4,TRUE,230,230,230,50);

 /* chart に data を配置しグラフを描く */
 /* 棒グラフの場合は drawBarGraph */
 $chart->drawBarGraph($data->GetData(), $data->GetDataDescription(), TRUE);

 /* 凡例を追加する */
 $chart->setFontProperties($font_path,8);
 $chart->drawLegend(596,150,$data->GetDataDescription(),255,255,255);

 /* グラフタイトルを追加する */
 $chart->setFontProperties($font_path,10);
 $chart->drawTitle(50,22,"数学のテスト結果",50,50,50,585);

 /* 画像として出力する */
 $chart->Stroke();
}
プルダウンメニューで表示する内容を変更する
- exams テーブルに以下のデータが入っているとする。
Table: exams テーブル
id user_id date math english physics 1 1 2008-10-01 49 36 56 2 2 2008-10-01 45 48 42 3 3 2008-10-01 72 80 91 21 3 2008-12-15 86 0 0 20 2 2008-12-15 30 0 0 19 1 2008-12-15 49 0 0 24 3 2009-03-18 63 0 0 23 2 2009-03-18 54 0 0 22 1 2009-03-18 89 0 0 - ajax ヘルパーの observeField() メソッドを使用することで user_id のプルダウンメニューを定期的に監視し、変化があった時に exam_table が呼び出される。
- exam_table では $this->data を使用してフォームに入力された user_id の値を取得し、該当する user_id のデータのみを返すようにできる。
- views/exams/index.ctp に以下を記述
<?php echo $form->create('user_id'); echo $form->input('user_id', array('options' => array(1, 2, 3))); echo $form->end(); ?> <div id="result">ここに結果が</div> <?php echo $ajax->observeField('user_id', array( 'url' => array('action' => 'exam_table'), 'frequency' => 0.2, 'update' => 'result')); ?> - views/exams/exams_table.ctp を追加
<body> <table border="1"> <tr> <th>ID</th> <th>user_id</th> <th>Date</th> <th>math</th> <th>english</th> <th>physics</th> </tr> <?php foreach ($exams as $exam) { echo "<tr>\n"; echo "<td>" . $exam['Exam']['id']; "</td>\n"; echo "<td>" . $exam['Exam']['user_id']; "</td>\n"; echo "<td>" . $exam['Exam']['date']; "</td>\n"; echo "<td>" . $exam['Exam']['math']; "</td>\n"; echo "<td>" . $exam['Exam']['english']; "</td>\n"; echo "<td>" . $exam['Exam']['physics']; "</td>\n"; echo "</tr>\n"; } ?> </table> </body> - controllers/exams_controller.php に以下を追加
function exam_table() {
 $conditions = array('user_id' => $this->data['user_id'] + 1);
 $order = 'date';
 $exams = $this->Exam->find('all',
       array('conditions' => $conditions,
      'order' => $order));
 $this->set('exams', $exams);
}
[CakePHP]基本
CakePHPの基本構成
CakePHPはModel, Controller, Viewの3要素から構成される。
見た目はviews以下のindex.ctpに従う
表示されるデータはcontrollers以下のusers_controller.phpに従う
データベースアクセスのための基本
データベースのテーブル1つに対してModelが1つ対応する
テーブル名は複数形で付け、idというprimary, auto_incrementのフィールドを準備する
例
Table: CakePHP の要素
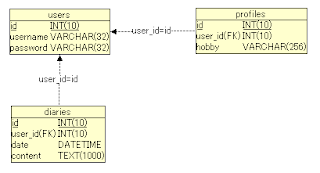
Table: usersテーブル
Table: profilesテーブル
Table: diariesテーブル
デバッグ
views/users/index.ctp内に
CakePHPはModel, Controller, Viewの3要素から構成される。
- Database
データベースのテーブル名は複数形で定義する。例えばユーザ情報を保持するデータベースであればusersと複数形にする。 - Model
/app/models/以下に単数形で定義ファイルを置く。先ほどのusersテーブルに対する定義は/app/models/user.phpに記述する。ファイル名は単数形であることに注意。class User extends AppModel
- Controller
/app/controllers/以下に複数形+_controllerという定義ファイルを置く。usersテーブルに対するコントローラは/app/controllers/users_controller.phpとファイル名が複数形になることに注意。class UsersController extends AppController
- View
/app/views/以下に複数形のディレクトリを作成し、controllerが処理するための入り口ページを置く。先ほどのusers_controller.phpにindexページから入った時の処理を記述してあるならば、/app/views/users/index.ctpというファイルを置く。views下のディレクトリ名が複数形であることに注意。
見た目はviews以下のindex.ctpに従う
表示されるデータはcontrollers以下のusers_controller.phpに従う
データベースアクセスのための基本
データベースのテーブル1つに対してModelが1つ対応する
テーブル名は複数形で付け、idというprimary, auto_incrementのフィールドを準備する
例
Table: CakePHP の要素
| Database | users | profiles | diaries |
| Model | User | Profile | Diary |
| Controller | UsersController | ProfilesController | DiariesController |
| View | app/views/users/index.ctp | app/views/profiles/index.ctp | app/views/diaries/index.ctp |

Table: usersテーブル
| id | INT(10) | Primary key, auto_increment |
| username | VARCHAR(32) | |
| password | VARCHAR(32) |
| id | INT(10) | Primary key, auto_increment |
| user_id | INT(10) | users.idへの外部キー |
| hobby | VARCHAR(256) |
| id | INT(10) | Primary key, auto_increment |
| user_id | INT(10) | users.idへの外部キー |
| date | DATETIME | |
| content | TEXT(1000) |
- アソシエーションを定義する
- アソシエーションによりデータベーステーブルに定義した外部キーを使用してテーブル間のリレーションを構築できる。
usersにはprofilesが1つとdiariesが複数ぶら下がる構成とする場合models/user.phpに$hasOneと$hasManyを定義する。
データベースの命名規則がCakePHPのものに従っていればこれだけでOK。<?php class User extends AppModel { var $name = 'User'; var $hasOne = 'Profile'; var $hasMany = 'Diary'; } ?> - 続いてprofilesはusersにぶら下がっている(属している)ことを定義する。
models/profile.phpに$belongsToを記述する。<?php class Profile extends AppModel { var $name = 'Profile'; var $belongsTo = 'User'; } ?> - 同様にdiariesはusersにぶら下がっている(属している)ことを定義する。
models/diary.phpに$belongsToを記述する。<?php class Diary extends AppModel { var $name = 'Diary'; var $belongsTo = 'User'; } ?>
- アソシエーションによりデータベーステーブルに定義した外部キーを使用してテーブル間のリレーションを構築できる。
デバッグ
views/users/index.ctp内に
<?php debug($user, $showHTML=true, $showForm=false); ?>と書くと以下のように表示してくれる。
Array
(
    [0] => Array
    (
        [User] => Array
            (
                [id] => 1
                [username] => user1
                [password] => password1
            )

        [Profile] => Array
            (
                [id] => 1
                [user_id] => 1
                [hobby] => 読書
            )

        [Diary] => Array
            (
                [0] => Array
                    (
                        [id] => 1
                        [user_id] => 1
                        [date] => 2009-02-20 14:22:06
                        [content] => テストです。
                    )
            )
    )

    [1] => Array
    (
        [User] => Array
            (
                [id] => 2
                [username] => user2
                [password] => password2
            )

        [Profile] => Array
            (
                [id] => 2
                [user_id] => 2
                [hobby] => 映画鑑賞
            )

        [Diary] => Array
            (
                [0] => Array
                    (
                        [id] => 2
                        [user_id] => 2
                        [date] => 2009-02-19 14:22:17
                        [content] => はじめまして
                    )

                [1] => Array
                    (
                        [id] => 3
                        [user_id] => 2
                        [date] => 2009-02-20 14:37:30
                        [content] => 2度目の更新です。
                    )

                [2] => Array
                    (
                        [id] => 4
                        [user_id] => 2
                        [date] => 2009-02-21 14:37:45
                        [content] => 明日の予定は・・・
                    )
            )
    )
)
登録:
投稿 (Atom)