- DocBook XML Mode for GNU Emacs | Download DocBook XML Mode for GNU Emacs software for free at SourceForge.net から docbook-xml-mode.x.x.tar.gz をダウンロードする
- ダウンロードしたファイルを解凍し、emacs/site-lisp 以下に置く
- .emacs に以下を追記
;;; ===== DocBook XML =====
(load "docbook-xml-mode.el")
- docbook ファイルを開いて M-x docbook-xml-mode を実行すると DocBook XML モードが動き出す
2013年6月9日日曜日
[Emacs]DocBook XML モード

[Python]TeX の数式を png に出力するスクリプト
[TeX] 数式文字列を png ファイルにして出力する の手順を python スクリプトで実行できるようにする。
実行結果

# -*- coding:utf-8 -*-
import os
import optparse

########################################################################
## Check options
########################################################################
def checkOption(opt):
 if opt == None:
  parser.print_help()
  exit()

skeleton = """
\\documentclass[11pt,a4paper]{report}
\\pagestyle{empty}
\\begin{document}
\\%s{$%s$}
\\end{document}
"""

parser = optparse.OptionParser()
parser.add_option("-t", "--tex", dest="tex", help="tex format", metavar="[TEX]")
parser.add_option("-s", "--size", dest="size", help="Font size (0-9)", default="4", metavar="[SIZE]")
parser.add_option("-o", "--output", dest="out", help="output file name prefix", metavar="[OUT]")
(options, args) = parser.parse_args()
checkOption(options.tex)
checkOption(options.size)
checkOption(options.out)

print "tex   : %s" % (options.tex)
print "size  : %s" % (options.size)
print "output: %s" % (options.out)

# フォントサイズを決める
if options.size == "0":
 fontsize = "tiny"
elif options.size == "1":
 fontsize = "scriptsize"
elif options.size == "2":
 fontsize = "footnotesize"
elif options.size == "3":
 fontsize = "small"
elif options.size == "4":
 fontsize = "normalsize"
elif options.size == "5":
 fontsize = "large"
elif options.size == "6":
 fontsize = "Large"
elif options.size == "7":
 fontsize = "LARGE"
elif options.size == "8":
 fontsize = "huge"
elif options.size == "9":
 fontsize = "Huge"
else:
 fontsize = "normalsize"

texdata = skeleton % (fontsize, options.tex)
print texdata

outputBase = options.out
texFilename = outputBase + ".tex"
dviFilename = outputBase + ".dvi"
pngFilename = outputBase + ".png"

fd = open(texFilename, "w")
fd.write(texdata)
fd.close()

os.system("platex %s" % (texFilename))
os.system("dvipng %s -o %s -T tight" % (dviFilename, pngFilename))

print "Remove temporary files"
print " %s, %s, %s, %s" % (texFilename, dviFilename, outputBase + ".log", outputBase + "aux")
os.remove(texFilename)
os.remove(dviFilename)
os.remove(outputBase + ".log")
os.remove(outputBase + ".aux")
実行結果
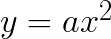
python tex2png.py -t "y=ax^{2}" -o y_ax2

python tex2png.py -t "y=ax^{2}" -s 1 -o y_ax2_1

python tex2png.py -t "y=ax^{2}" -s 9 -o y_ax2_9

[Python]os モジュール
スクリプトを動作させている OS を区別する
os モジュールの name を使う
Windows XP で動作させた場合
Fedora13 で動作させた場合
matplotlib で日本語フォントを使う場合、Windows と Linux ではフォントの指定先が異なるので次のように分ける。
os モジュールの name を使う
# -*- coding:utf-8 -*-
import os

if os.name == "nt":
    print "OS name is %s (Windows XP)" % (os.name)
elif os.name == "posix":
    print "OS name is %s (Linux)" % (os.name)
else:
    print "OS name is %s" % (os.name)
Windows XP で動作させた場合
> python test.py
OS name is nt (Windows XP)
Fedora13 で動作させた場合
$ python test.py
OS name is posix (Linux)
matplotlib で日本語フォントを使う場合、Windows と Linux ではフォントの指定先が異なるので次のように分ける。
# フォントを指定して日本語表示
if os.name == "nt":
    # Windows の場合
    prop = fm.FontProperties(fname='C:\\WINDOWS\\Fonts\\ipamp.ttf')
else:
    # Linux の場合
    prop = fm.FontProperties(fname='/usr/share/fonts/ipa-pmincho/ipamp.ttf')

plt.xticks(ind + width / 2., (u'東京 1 月', u'東京 8 月', u'那覇 1 月', u'那覇 8 月'), fontproperties=prop)
[Python]Logger
ログファイルを作成する時は logging モジュールを使う
出力結果 (test.log)
ログレベルを設定, ログファイルに追記する場合
出力結果 (test.log)
# -*- coding: utf-8 -*-
import logging

logging.basicConfig(level=logging.DEBUG,
                    format='%(asctime)s %(levelname)-8s %(message)s',
                    datefmt='%Y-%m-%d %H:%M:%S',
                    filename='./test.log',
                    filemode='w')
logging.debug("A debug message")
logging.info("An info message")
logging.warning("A warning message")
logging.error("An error message")
logging.critical("A critical message")
logging.exception("An exception message")
出力結果 (test.log)
2011-02-11 14:41:44 DEBUG A debug message
2011-02-11 14:41:44 INFO An info message
2011-02-11 14:41:44 WARNING A warning message
2011-02-11 14:41:44 ERROR An error message
2011-02-11 14:41:44 CRITICAL A critical message
2011-02-11 14:41:44 ERROR An exception message
None
ログレベルを設定, ログファイルに追記する場合
# -*- coding: utf-8 -*-
import logging

logging.basicConfig(level=logging.WARNING,
                    format='%(asctime)s %(levelname)-8s %(message)s',
                    datefmt='%Y-%m-%d %H:%M:%S',
                    filename='./test.log',
                    filemode='a')
logging.debug("A debug message")
logging.info("An info message")
logging.warning("A warning message")
logging.error("An error message")
logging.critical("A critical message")
logging.exception("An exception message")
出力結果 (test.log)
2011-02-11 14:42:45 WARNING A warning message
2011-02-11 14:42:45 ERROR An error message
2011-02-11 14:42:45 CRITICAL A critical message
2011-02-11 14:42:45 ERROR An exception message
None
[Python]Flickr API
インストール
Search
Upload
スクリプトを実行すると Upload を許可しても良いかの確認画面が表示される
- Scripts/easy_install.exe を使って flickrapi module をインストールする
> cd Python25/Scripts
> easy_install.exe flickrapi
Reading http://pypi.python.org/simple/flickrapi/
Reading http://flickrapi.sf.net/
Reading http://stuvel.eu/projects/flickrapi
Best match: flickrapi 1.4.2
Downloading http://pypi.python.org/packages/2.5/f/flickrapi/flickrapi-1.4.2-py2.5.egg#md5=d2312c2ee10b838afe7d607b51b969d6
Processing flickrapi-1.4.2-py2.5.egg
Moving flickrapi-1.4.2-py2.5.egg to python25\lib\site-packages
Adding flickrapi 1.4.2 to easy-install.pth file
Installed python25\lib\site-packages\flickrapi-1.4.2-py2.5.egg
Processing dependencies for flickrapi
Finished processing dependencies for flickrapi
- Sign in to Yahoo! から API Key と Secret code を入手する
- 自分のページから Tag を指定して検索する
自分のユーザー ID は Flickr の photostream を開いた時に URL に表示される。
http://www.flickr.com/photos/************/
の *** の部分
Search
# -*- coding: utf-8 -*-
# Flickr API テストスクリプト (Search)
import flickrapi

api_key = '入手した API key'
flickr = flickrapi.FlickrAPI(api_key)
my_user_id = '自分のユーザー ID'
search_tags = '検索する Tag'

for photo in flickr.walk(user_id=my_user_id, tags=search_tags):
    print "title: ", photo.get('title')
    print "id: ", photo.get('id')
    print "secret: ", photo.get('secret')
    print "URL: http://www.flickr.com/photos/%s/%s/" % (my_user_id, photo.get('id'))
取得できる結果のパラメータ (photo.get() に渡している引数) は Flickr Services: Flickr API: flickr.photos.search の Example Response 参照
Upload
スクリプトを実行すると Upload を許可しても良いかの確認画面が表示される
# -*- coding: utf-8 -*-
# Flickr API テストスクリプト (Upload)
import flickrapi

api_key = '入手した API Key'
api_secret = '入手した API secret code'
flickr = flickrapi.FlickrAPI(api_key, api_secret)

# Web ブラウザに Flickr 画面が表示され、このスクリプトから upload をしても良いか許可を求められる
(token, frob) = flickr.get_token_part_one(perms='write')
if not token: raw_input("Press ENTER after you authorized this program")
flickr.get_token_part_two((token, frob))
u_filename = 'test.jpg'
u_title = 'test'
flickr.upload(filename=u_filename, title=u_title)
[Python]ディレクトリ
ディレクトリ作成
ディレクトリ作成には os モジュールの mkdir() を使う
実行結果
ディレクトリ削除
ディレクトリ削除には os モジュールの rmdir() を使う
実行結果
ディレクトリ内のファイル走査
ディレクトリ作成には os モジュールの mkdir() を使う
# -*- coding: utf-8 -*-
# ディレクトリ作成
import os
import os.path

target = "test"
if os.path.exists("./" + target) == True:
    print "%s has already existed." % (target)
else:
    os.mkdir(target)
実行結果
$ ls
mkdir.py rmdir.py
$ python mkdir.py
$ python mkdir.py
test has already existed.
$ ls
mkdir.py rmdir.py test
ディレクトリ削除
ディレクトリ削除には os モジュールの rmdir() を使う
# -*- coding: utf-8 -*-
# ディレクトリ削除
import os

target = "test"
if os.path.exists("./" + target) == True:
    os.rmdir("test")
else:
    print "%s does not exist." % (target)
実行結果
$ ls
mkdir.py rmdir.py test
$ python rmdir.py
$ python rmdir.py
test does not exist.
$ ls
mkdir.py rmdir.py
ディレクトリ内のファイル走査
- os.path.walk
Current directory の中身を走査して jpg ファイルを選び出す# -*- coding: utf-8 -*- import os import re def callback(arg, dirname, filenames): print "dirname: ", dirname for file in filenames: print file if re.search("jpg$", file): print "---> This file is JPEG" arglist = [] os.path.walk('./', callback, arglist)
実行結果> python dir.py dirname: ./ aaa.txt bbb.txt ccc.jpg ---> This file is JPEG dir.py
- os.walk
Python 2.3 以降では os.path.walk ではなく os.walk を使う# -*- coding: utf-8 -*- import os top = '.' print "--- os.walk(top) ---" for root, dirs, files in os.walk(top): for name in files: print "File: %s" % (name) for name in dirs: print "Dir: %s" % (name) # リストの並び順が変わる print "--- os.walk(top, topdown=False) ---" for root, dirs, files in os.walk(top, topdown=False): for name in files: print "File: %s" % (name) for name in dirs: print "Dir: %s" % (name)
実行結果> python dir2.py --- Recursive os.walk(top) --- File: aaa.txt File: bbb.txt File: ccc.jpg File: dir.py File: dir2.py Dir: test File: aaa.txt --- Non-recursive os.walk(top, topdown=False) --- File: aaa.txt File: aaa.txt File: bbb.txt File: ccc.jpg File: dir.py File: dir2.py Dir: test
- os.listdir
# -*- coding: utf-8 -*- import os top = '.' # 指定した path に含まれる要素のリストを作成する ls = os.listdir(top) print ls for name in ls: print name出力結果> python list.py ['aaa.txt', 'bbb.txt', 'ccc.jpg', 'dir.py', 'dir2.py', 'list.py', 'test'] aaa.txt bbb.txt ccc.jpg dir.py dir2.py list.py test
[Python]CSV
CSV ファイル読み込み
CSV ファイルを読み込むには csv モジュールを使用する。
Example: CSV 読み込みスクリプト (test00.py)
Example: csv ファイル (tokyo2010.csv)
実行結果
CSV ファイルへの出力
Example: CSV への出力スクリプト (test01.py)
出力結果
CSV ファイルを読み込むには csv モジュールを使用する。
Example: CSV 読み込みスクリプト (test00.py)
# -*- coding:utf-8 -*-
import csv

f = open("tokyo2010.csv", "rb")
reader = csv.reader(f)
for row in reader:
    print row

    try:
        temp = float(row[3])
        if temp >= 15:
            # 数値に変換して 15 ℃以上であれば表示
            print " ---> Over 15 degrees C (%.1f)" % temp
    except ValueError:
        # float 変換できなければこちらに入る
        print "Not float"

# 先頭に戻る
print "------------------------------------"
f.seek(0)
for row in reader:
    print row

f.close()
Example: csv ファイル (tokyo2010.csv)
Month,Ave. Atmosphere Pressure(hPa),Precipitation(mm),Ave. Daily Temperature(degree C),Ave. Humidity(%),Ave. Wind Speed(m/s),Sunshine Duration(h)
1,1010.2,9,7,41,2.7,221.9
2,1012.6,115,6.5,60,2.8,118.3
3,1012.7,143.5,9.1,61,3.2,139.8
4,1013.6,214,12.4,62,3.1,139.9
5,1007.3,114,19,60,3.2,198.8
6,1007.1,108,23.6,67,2.9,162.5
7,1005.9,70,28,70,3.3,182.7
8,1009.7,27,29.6,67,3.4,222.6
9,1008.3,428,25.1,68,2.9,165.3
10,1012.7,211,18.9,68,2.5,81.4
11,1012.3,94.5,13.5,56,2.4,158.9
12,1005.1,145.5,9.9,50,2.7,194.9
実行結果
$ python test00.py
['Month', 'Ave. Atmosphere Pressure(hPa)', 'Precipitation(mm)', 'Ave. Daily Temperature(degree C)', 'Ave. Humidity(%)', 'Ave. Wind Speed(m/s)', 'Sunshine Duration(h)']
Not float
['1', '1010.2', '9', '7', '41', '2.7', '221.9']
['2', '1012.6', '115', '6.5', '60', '2.8', '118.3']
['3', '1012.7', '143.5', '9.1', '61', '3.2', '139.8']
['4', '1013.6', '214', '12.4', '62', '3.1', '139.9']
['5', '1007.3', '114', '19', '60', '3.2', '198.8']
---> Over 15 degrees C (19.0)
['6', '1007.1', '108', '23.6', '67', '2.9', '162.5']
---> Over 15 degrees C (23.6)
['7', '1005.9', '70', '28', '70', '3.3', '182.7']
---> Over 15 degrees C (28.0)
['8', '1009.7', '27', '29.6', '67', '3.4', '222.6']
---> Over 15 degrees C (29.6)
['9', '1008.3', '428', '25.1', '68', '2.9', '165.3']
---> Over 15 degrees C (25.1)
['10', '1012.7', '211', '18.9', '68', '2.5', '81.4']
---> Over 15 degrees C (18.9)
['11', '1012.3', '94.5', '13.5', '56', '2.4', '158.9']
['12', '1005.1', '145.5', '9.9', '50', '2.7', '194.9']
------------------------------------
['Month', 'Ave. Atmosphere Pressure(hPa)', 'Precipitation(mm)', 'Ave. Daily Temperature(degree C)', 'Ave. Humidity(%)', 'Ave. Wind Speed(m/s)', 'Sunshine Duration(h)']
['1', '1010.2', '9', '7', '41', '2.7', '221.9']
['2', '1012.6', '115', '6.5', '60', '2.8', '118.3']
['3', '1012.7', '143.5', '9.1', '61', '3.2', '139.8']
['4', '1013.6', '214', '12.4', '62', '3.1', '139.9']
['5', '1007.3', '114', '19', '60', '3.2', '198.8']
['6', '1007.1', '108', '23.6', '67', '2.9', '162.5']
['7', '1005.9', '70', '28', '70', '3.3', '182.7']
['8', '1009.7', '27', '29.6', '67', '3.4', '222.6']
['9', '1008.3', '428', '25.1', '68', '2.9', '165.3']
['10', '1012.7', '211', '18.9', '68', '2.5', '81.4']
['11', '1012.3', '94.5', '13.5', '56', '2.4', '158.9']
['12', '1005.1', '145.5', '9.9', '50', '2.7', '194.9']
CSV ファイルへの出力
Example: CSV への出力スクリプト (test01.py)
# -*- coding:utf-8 -*-
import csv

f = open("out.csv", "wb")
writer = csv.writer(f)

row = ["Tokyo", 1, 7.0]
writer.writerow(row)
row = ["Tokyo", 8, 29.6]
writer.writerow(row)
row = ["Naha", 1, 16.8]
writer.writerow(row)
row = ["Naha", 8, 28.9]
writer.writerow(row)

f.close()
出力結果
Tokyo,1,7.0
Tokyo,8,29.6
Naha,1,16.8
Naha,8,28.9
改行コードを LF (\n) にする場合は cvs.writer() に lineterminator 引数で指定する。
writer = csv.writer(f, lineterminator="\n")
登録:
投稿 (Atom)