2015年8月15日土曜日

robocopy

backup
オプション
/Eサブディレクトリをコピー。空のディレクトリもコピーする
/FFTFATファイル時間(2秒の精度)を想定。FATファイルはタイムスタンプを偶数秒単位でしか記録していないためにNTFS - FAT間でファイルコピーをするとタイムスタンプに差が生じる
/R:0コピー失敗時の再試行回数を 0 にする
/MIRディレクトリツリーをミラー化する。/Eと/PURGEを組み合わせたもの
補足
/Eサブディレクトリをコピー。空のディレクトリもコピーする
/PURGEコピー先のファイルとソース内に存在しないディレクトリを削除する
robocopy c:\src c:\dst /FFT /R:0 /MIR

[Python]PyMedia

PyMedia から最新版 (pymedia-1.3.7.3.tar.gz, 2014/08/11時点) をダウンロードする。 ダウンロードしたファイルを解凍する。
$ tar zxvf pymedia-1.3.7.3.tar.gz
必要なライブラリをインストールする。 ライブラリが足りないとビルドする時に下記のように表示される。
$ python setup.py build
Using UNIX configuration...

OGG : not found
VORBIS : not found
FAAD : not found
MP3LAME : not found
VORBISENC : not found
ALSA : not found
Continue building pymedia ? [Y,n]:
依存関係解消できず。(2014/08/11) ビルド
$ python setup.py build
インストール
# python setup.py install

2015年8月14日金曜日

[Python][pyExcelerator]動作確認

次のデータが入った Excel ファイルを準備する
January February March April May June July August September October November December
tokyo 7.0 6.5 9.1 12.4 19.0 23.6 28.0 29.6 25.1 18.9 13.5 9.9
naha 16.8 18.3 19.9 21.2 23.8 26.7 28.7 28.9 28.0 25.7 21.4 18.1
sapporo -2.0 -3.2 -0.1 5.5 12.2 19.2 22.1 24.8 20.0 12.2 5.9 0.6
2 枚目の sheet, 3 枚目の sheet は空、Sheet 名は Sheet2, Sheet3
test00.py
# -*- coding:utf-8 -*-
import pyExcelerator

xlsSheets = pyExcelerator.parse_xls("test00.xls")
# (Sheet 名, シートの中身) というリストで格納される
print xlsSheets
for sheetName, values in xlsSheets:
    print "Sheet name: %s" % (sheetName)
    print "values.keys(): ", sorted(values.keys())
    row = ""
    for rowIdx, colIdx in sorted(values.keys()):
        v = values[(rowIdx, colIdx)]
        print "(%d, %d): %s" % (rowIdx, colIdx, v)

実行結果
> python test00.py
[(u'Sheet1', {(1, 3): 9.1, (3, 0): u'sapporo', (2, 8): 28.9, (3, 11): 5.9, (0, 7): u'July', (1, 6): 23.6, (0, 10): u'October', (2, 10): 25.7, (3, 7): 22.1, (0,3): u'March', (1, 11): 13.5, (2, 5): 23.8, (1, 2): 6.5, (3, 3): -0.1, (2, 9): 28.0, (2, 0): u'naha', (3, 10): 12.2, (1, 5): 19.0, (0, 11): u'November', (3, 6):19.2, (0, 4): u'April', (1, 10): 18.9, (1, 1): 7.0, (2, 7): 28.7, (3, 2): -3.2,(2, 6): 26.7, (2, 2): 18.3, (1, 4): 12.4, (0, 12): u'December', (2, 1): 16.8, (3, 9): 20.0, (0, 5): u'May', (1, 9): 25.1, (1, 0): u'tokyo', (0, 8): u'August', (3, 5): 12.2, (0, 1): u'January', (3, 12): 0.6, (1, 12): 9.9, (3, 1): -2.0, (2, 11): 21.4, (2, 4): 21.2, (3, 8): 24.8, (0, 6): u'June', (1, 8): 29.6, (1, 7): 28.0, (0, 9): u'September', (2, 3): 19.9, (3, 4): 5.5, (0, 2): u'February', (2, 12): 18.1}), (u'Sheet2', {}), (u'Sheet3', {})]
Sheet name: Sheet1
values.keys():  [(0, 1), (0, 2), (0, 3), (0, 4), (0, 5), (0, 6), (0, 7), (0, 8), (0, 9), (0, 10), (0, 11), (0, 12), (1, 0), (1, 1), (1, 2), (1, 3), (1, 4), (1,5), (1, 6), (1, 7), (1, 8), (1, 9), (1, 10), (1, 11), (1, 12), (2, 0), (2, 1), (2, 2), (2, 3), (2, 4), (2, 5), (2, 6), (2, 7), (2, 8), (2, 9), (2, 10), (2, 11), (2, 12), (3, 0), (3, 1), (3, 2), (3, 3), (3, 4), (3, 5), (3, 6), (3, 7), (3, 8), (3, 9), (3, 10), (3, 11), (3, 12)]
(0, 1): January
(0, 2): February
(0, 3): March
(0, 4): April
(0, 5): May
(0, 6): June
(0, 7): July
(0, 8): August
(0, 9): September
(0, 10): October
(0, 11): November
(0, 12): December
(1, 0): tokyo
(1, 1): 7.0
(1, 2): 6.5
(1, 3): 9.1
(1, 4): 12.4
(1, 5): 19.0
(1, 6): 23.6
(1, 7): 28.0
(1, 8): 29.6
(1, 9): 25.1
(1, 10): 18.9
(1, 11): 13.5
(1, 12): 9.9
(2, 0): naha
(2, 1): 16.8
(2, 2): 18.3
(2, 3): 19.9
(2, 4): 21.2
(2, 5): 23.8
(2, 6): 26.7
(2, 7): 28.7
(2, 8): 28.9
(2, 9): 28.0
(2, 10): 25.7
(2, 11): 21.4
(2, 12): 18.1
(3, 0): sapporo
(3, 1): -2.0
(3, 2): -3.2
(3, 3): -0.1
(3, 4): 5.5
(3, 5): 12.2
(3, 6): 19.2
(3, 7): 22.1
(3, 8): 24.8
(3, 9): 20.0
(3, 10): 12.2
(3, 11): 5.9
(3, 12): 0.6
Sheet name: Sheet2
values.keys():  []
Sheet name: Sheet3
values.keys():  []

[Python][pyExcelerator]インストール

  1. pyExcelerator から pyexcelerator-0.6.4.1.zip (2011/05/04 現在) をダウンロードする
  2. setup.py を実行してインストールする
    > python setup.py install
    

[Python]mod_wsgiインストール

  1. mod_wsgi をインストール
    # yum install mod_wsgi
    
  2. /etc/httpd/conf/httpd.conf を編集
    # mod_wsgi
    LoadModule wsgi_module modules/mod_wsgi.so
    WSGIScriptAlias        /wsgi /var/www/cgi-bin/python/wsgi/test00.wsgi
    <Directory /var/www/cgi-bin/python/wsgi>
        Order allow,deny
        Allow from all
    </Directory>
    
  3. Test Script 作成
    test00.wsgi
    #!/usr/bin/python
    # -*- coding:utf-8 -*-
    def application(environ, start_response):
        status = '200 OK'
        output = "Hello, world!"
        response_header = [('Content-type', 'text/plain'),
                           ('Content-Length', str(len(output)))]
        start_response(status, response_header)
        return output
    
  4. Test script 配置
    httpd.conf で設定した WSGIScriptAlias (/var/www/cgi-bin/python/wsgi) に上記のスクリプトを置く
  5. http://localhost/wsgi/ へアクセスする

[Python][CGI]MySQL からデータを読み込んでグラフを描く

#!/usr/bin/python
# -*- coding:utf-8 -*-
import MySQLdb
import tempfile
import os

# エラー発生時にレポートを表示
import cgitb
cgitb.enable()

html = """
<META HTTP-EQUIV="Content-Type" CONTENT="text/html; CHARSET=utf-8"/>
<html>
<head>
<title>MySQL & Gnuplot</title>
</head>
<body>
data<br/>
%s
<img src="%s"/>
</body>
</html>
"""

####################################################################
# @brief グラフを描く
####################################################################
def drawGraph(dataFilename, pngfile, xmin, xmax, ymin, ymax):
 # plot データ作成
 (fd, pltFilename) = tempfile.mkstemp()

 # print "Plot tempfile name: %s" % (pltFilename)
 f = os.fdopen(fd, 'w')
 str = """
 set terminal png font "/usr/share/fonts/ipa-gothic/ipag.ttf,12"
 set output '%s'
 set title '各地の気温'
 set xlabel '場所'
 set ylabel '気温'
 set xrange [-1:3]
 set yrange [0:30]
 set boxwidth 0.5 relative
 set style fill solid 0.2
 set grid
 unset key
 plot '%s' using 2:xticlabels(1) with boxes
 """ % (pngfile, dataFilename)
 f.write(str)
 f.close()

 # gnuplot コマンド実行
 os.system("gnuplot %s" % pltFilename)

 # Temporary file 削除
 os.remove(pltFilename)

####################################################################
# @brief Main function
####################################################################
# DB に接続
db = MySQLdb.connect(user="username", passwd="password", db="dbname", charset="utf8")

# SELECT
q = "SELECT `area`, `temperature` FROM `temperature`;"
db.query(q)
result = db.store_result()

# データ表示 & データ格納
num = result.num_rows()
(fd, dataFilename) = tempfile.mkstemp()
f = os.fdopen(fd, 'w')
#print "filename: %s" % filename
data = """
<table border="1">
"""

for row in result.fetch_row(num):
 str = "<tr><td>%s</td><td>%.2f</td></tr>" % (row[0], row[1])
 data = data + str
 str = "%s\t%.2f\n" % (row[0], row[1])
 f.write(str)

data = data + "</table>"
f.close()

# グラフ作成
pngfile = "test03.png"
drawGraph(dataFilename, pngfile, -1, 3, 0, 30)

# Temporary file 削除
os.remove(dataFilename)

print html % (data, "test03.png")
これを実行しても SELinux が書き込みを禁止するので test03.png を cgi-bin 以下に生成することができない。
今は SELinux を一時停止して実験する。
# setenforce 0
この cgi ファイルのある場所に test03.png が作成されるが、cgi 実行権限のあるディレクトリ (cgi-bin) はすべて実行ファイルと解釈されるので画像が表示できない。
そこで httpd.conf の cgi ディレクトリ設定に AddHandler image/png .png を追加する。
<Directory "/var/www/cgi-bin">
AllowOverride None
Options None
Order allow,deny
Allow from all
AddHandler image/png .png
</Directory>
SELinux を有効のままでファイル書き込みを許可するにはスクリプトを実行するディレクトリの Type を httpd_sys_rw_content_t に変更する。
# ls -Z
drwxrwxrwx. root root unconfined_u:object_r:httpd_sys_script_exec_t:s0 python
# chcon -t httpd_sys_script_rw_t python/
# ls -Z
drwxrwxrwx. root root unconfined_u:object_r:httpd_sys_rw_content_t:s0 python

[Python][CGI]CGI で Cookie を使う

POST されたデータを Cookie で保存するように指示する
cookiePostResult.cgi
#!/usr/bin/python
# -*- coding:utf-8 -*-
import cgi
import cgitb

# エラー発生時にレポートを表示
cgitb.enable()
f = cgi.FieldStorage()
field1 = f.getfirst('field1', '')
field2 = f.getfirst('field2', '')

# Cookie に保存
print "Set-Cookie: FIELD1=%s" % (field1)
print "Set-Cookie: FIELD2=%s" % (field2)
print "\n"

html = """
<!DOCTYPE HTML PUBLIC "-//W3C//DTD HTML 4.01 Transitional//EN" "http://www.w3.org/TR/html4/loose.dtd">
<html>
<head>
<META http-equiv="Content-Type" content="text/html; charset=UTF-8"/>
<title>Cookie POST Result</title>
</head>
<body>
<h1>Cookie POST Result</h1>
Field1: %s<br/>
Field2: %s<br/>
<a href="/cgi-bin/python/cookiePostResult2.cgi">次へ</a>
</body>
</html>
"""

print html % (field1, field2)
Set-Cookie でクライアントのブラウザに Cookie 保存するように指示する。

保存された Cookie を読み込んで表示する
cookiePostResult2.cgi
#!/usr/bin/python
# -*- coding:utf-8 -*-
import os
import cgi
import cgitb
import Cookie

# Cookie の値を読み出す
cookie = Cookie.SimpleCookie()
cookie.load(os.environ["HTTP_COOKIE"])
field1 = cookie["FIELD1"].value
field2 = cookie["FIELD2"].value

html = """
<!DOCTYPE HTML PUBLIC "-//W3C//DTD HTML 4.01 Transitional//EN" "http://www.w3.org/TR/html4/loose.dtd">
<html>
<head>
<META http-equiv="Content-Type" content="text/html; charset=UTF-8"/>
<title>Cookie POST Result 2</title>
</head>
<body>
<h1>Cookie POST Result 2</h1>
Field1: %s<br/>
Field2: %s<br/>
</body>
</html>
"""

print html % (field1, field2)

[Python][numpy]行列計算

転置行列 (transpose)
a = numpy.arange(0, 6).reshape(2, 3) # 2x3 行列
print "arange(0, 6).reshapre(2, 3):"
print a
print "transpose():"
print a.transpose() # 転置行列 (transpose)
arange(0, 6).reshapre(2, 3):
[[0 1 2]
[3 4 5]]
transpose():
[[0 3]
[1 4]
[2 5]]


逆行列 (inverse)
a = numpy.arange(0, 4).reshape(2, 2) # 2x2 行列
print "arange(0, 4).reshapre(2, 2):"
print a
print "linalg.inv(a):"
print numpy.linalg.inv(a) # 逆行列 (inverse)
arange(0, 4).reshapre(2, 2):
[[0 1]
[2 3]]
linalg.inv(a):
[[-1.5 0.5]
[ 1. 0. ]]


[Python][numpy]様々な行列

すべて 0 の行列
a = numpy.zeros((3, 4)) # 3x4 行列
print "zeros((3, 4)):"
print a
zeros((3, 4)):
[[ 0. 0. 0. 0.]
[ 0. 0. 0. 0.]
[ 0. 0. 0. 0.]]


すべて 1 の行列
a = numpy.ones((3, 4)) # 3x4 行列
print "ones((3, 4)):"
print a
ones((3, 4)):
[[ 1. 1. 1. 1.]
[ 1. 1. 1. 1.]
[ 1. 1. 1. 1.]]


単位行列
i = numpy.identity(3) # 3x3 単位行列 (identity matirx)
print "identity(3):"
print i
identity(3):
[[ 1. 0. 0.]
[ 0. 1. 0.]
[ 0. 0. 1.]]


要素を指定して行列生成
a = numpy.array([0, 2, 3, 4, 6, 8]).reshape(2, 3)
print "array([0, 2, 3, 4, 6, 8]).reshape(2, 3):"
print a
array([0, 2, 3, 4, 6, 8]).reshape(2, 3):
[[0 2 3]
[4 6 8]]


特定の対角のみ 1 にする行列
a = numpy.eye(3)
print "eye(3):"
print a
a = numpy.eye(3, k=1)
print "eye(3, k=1):"
print a
eye(3):
[[ 1. 0. 0.]
[ 0. 1. 0.]
[ 0. 0. 1.]]
eye(3, k=1):
[[ 0. 1. 0.]
[ 0. 0. 1.]
[ 0. 0. 0.]]


[Python][numpy]numpy 事始

# -*- coding:utf-8 -*-
import numpy

a = numpy.arange(5) # start:0, stop:5
print "arange(5): ",
print a

a = numpy.arange(3, 10) # start:3, stop:10
print "arange(3, 10): ",
print a

a = numpy.arange(3, 10, 2) # start:3, stop:10, step:2
print "arange(3, 10, 2): ",
print a

a = numpy.linspace(0, 2, 6) # 0 から 2 までを 6 段階に線形分割
print "linespace(0, 2, 6): ",
print a

a = numpy.arange(10).reshape(2, 5)
print "arange(10).reshape(2, 5):"
print a
print "a.shape: ",
print a.shape
print "a.ndim: ",
print a.ndim
実行結果
> python test00.py
arange(5): [0 1 2 3 4]
arange(3, 10): [3 4 5 6 7 8 9]
arange(3, 10, 2): [3 5 7 9]
linespace(0, 2, 6): [ 0. 0.4 0.8 1.2 1.6 2. ]
arange(10).reshape(2, 5):
[[0 1 2 3 4]
[5 6 7 8 9]]
a.shape: (2, 5)
a.ndim: 2
lispace(0, 2, 6) で 0 から 2 までを 6 段階に線形分割した数列を得られる。
arange(10).reshapre(2, 5) で 0 から 10 まで (10 は含まず) の数値 (0 - 9) を 2x5 行列に並び替えている

[Python][Paramiko(sftp)]カレントディレクトリのファイルをサーバーにアップする

ソースコード
# -*- coding:utf-8 -*-
##########################################################################
# ファイルアップロードスクリプト
##########################################################################
import os
import re
import paramiko

## Upload files
def uploadFiles(top, exp):
    for file in os.listdir(top):
    if re.search(exp, file):
        print top + file
        sfconn.put(top + file, top + file)

## Main function
host = 'serveraddress'
user = 'username'
password = 'password'

currentDir = ''
dstDir = 'documents/' + currentDir
dstImgDir = 'documents/' + currentDir + 'img'

conn = paramiko.SSHClient()
conn.set_missing_host_key_policy(paramiko.AutoAddPolicy())
conn.connect(host, username=user, password=password)
sfconn = conn.open_sftp()

sfconn.chdir(dstDir)

uploadFiles('./', 'html$')
uploadFiles('./img/', 'png$')

sfconn.close()
conn.close() 

[Python][Paramiko(sftp)]基本的な使い方

情報元: Paramiko
ソースコード
# -*- coding:utf-8 -*-
import paramiko

host = 'serveraddress'
user = 'username'
password = 'password'

conn = paramiko.SSHClient()
conn.set_missing_host_key_policy(paramiko.AutoAddPolicy())
conn.connect(host, username=user, password=password)
sfconn = conn.open_sftp()

# カレントディレクトリのファイル一覧を取得
files = sfconn.listdir()
for f in files:
    print f

# ファイルを置く・取得する
sfconn.get('test.txt', 'test.txt')
sfconn.put('paramiko.txt', './paramiko.txt')

sfconn.close()
conn.close()

[Python][HTTP]Cookie 処理

urllib2.HTTPCookieProcessor() を使って Cookie 処理を行う。
# -*- coding: utf-8 -*-
## Cookie を使う
import urllib
import urllib2
import cookielib

# POST データ作成
req = {'field1':'abcde', 'field2':'12334'}
print req
params = urllib.urlencode(req)
print params

# Cookie handler
cj = cookielib.CookieJar()
cookieHandler = urllib2.HTTPCookieProcessor(cj)
opener = urllib2.build_opener(cookieHandler)
urllib2.install_opener(opener)

# localhost の Web サーバーに IIS を使っている場合は localhost 指定の Cookie を
# 作ることができないのでエラー終了する
url = 'http://localhost/cgi-bin/python/cookiePostResult.cgi'
request = urllib2.Request(url, params)
f = urllib2.urlopen(request)
print f.info()
data = f.read()
print data
print "================"
for index, cookie in enumerate(cj):
print index, ':', cookie
print cj
print "================"
url = 'http://localhost/cgi-bin/python/cookiePostResult2.cgi'
request = urllib2.Request(url)
f = urllib2.urlopen(request)
data = f.read()
print data
実行結果
$ python test04.py
{'field2': '12334', 'field1': 'abcde'}
field2=12334&field1=abcde
Date: Sun, 16 Jan 2011 07:12:21 GMT
Server: Apache/2.2.17 (Fedora)
Set-Cookie: FIELD1=abcde
Set-Cookie: FIELD2=12334
Connection: close
Transfer-Encoding: chunked
Content-Type: text/html; charset=UTF-8

<!DOCTYPE HTML PUBLIC "-//W3C//DTD HTML 4.01 Transitional//EN" "http://www.w3.org/TR/html4/loose.dtd">
<html>
<head>
<META http-equiv="Content-Type" content="text/html; charset=UTF-8"/>
<title>Cookie POST Result</title>
</head>
<body>
<h1>Cookie POST Result</h1>
Field1: abcde<br/>
Field2: 12334<br/>
<a href="/cgi-bin/python/cookiePostResult2.cgi">次へ</a>
</body>
</html>
================
0 : <Cookie FIELD1=abcde for localhost.local/cgi-bin/python>
1 : <Cookie FIELD2=12334 for localhost.local/cgi-bin/python>
<cookielib.CookieJar[<Cookie FIELD1=abcde for localhost.local/cgi-bin/python>, <Cookie FIELD2=12334 for localhost.local/cgi-bin/python>]>
================
<!DOCTYPE HTML PUBLIC "-//W3C//DTD HTML 4.01 Transitional//EN" "http://www.w3.org/TR/html4/loose.dtd">
<html>
<head>
<META http-equiv="Content-Type" content="text/html; charset=UTF-8"/>
<title>Cookie POST Result 2</title>
</head>
<body>
<h1>Cookie POST Result 2</h1>
Field1: abcde<br/>
Field2: 12334<br/>
</body>
</html>
Web サーバーが IIS の場合 localhost の名前解決ができない場合に Cookie の保存ができないようだ。実験した環境では Cookie の保存ができず urlopen() でエラーとなった。
Linux Apache でテストした時は localhost 指定でも問題なく urlopen() できた。

[Python][HTTP]POST

POST するデータを urllib.urlencode() で作成し、urllib2.Request() で POST 先 URL とまとめてからアクセスする。
# -*- coding: utf-8 -*-
## POST
import urllib
import urllib2

# POST データ作成
req = {'field1':'abcde', 'field2':'12334'}
print req
params = urllib.urlencode(req)
print params
url = 'http://localhost/cgi-bin/python/postResult.cgi'
request = urllib2.Request(url, params)
f = urllib2.urlopen(request)
data = f.read()
print data
実行結果
$ python test03.py
{'field2': '12334', 'field1': 'abcde'}
field2=12334&field1=abcde
<!DOCTYPE HTML PUBLIC "-//W3C//DTD HTML 4.01 Transitional//EN" "http://www.w3.org/TR/html4/loose.dtd">
<html>
<head>
<META http-equiv="Content-Type" content="text/html; charset=UTF-8"/>
<title>POST Result</title>
</head>
<body>
<h1>POST Result</h1>
Field1: abcde<br/>
Field2: 12334<br/>
</body>
</html>

[Python][HTTP]ファイルをダウンロード

read したファイルを write でファイルに書き出すことでファイルをダウンロードする。
# -*- coding: utf-8 -*-
## HTTP でファイルをダウンロードする
import urllib2

url = 'http://ftp.gnu.org/gnu/hello/hello-2.6.tar.gz'
f = urllib2.urlopen(url)
data = f.read()

# 出力先ファイルを指定して書き込む
out = open("hello-2.6.tar.gz", "wb")
out.write(data)
out.close()

[Python][HTTP]Proxy 経由

Proxy 経由でアクセスする場合は urllib2.ProxyHandler() を使って設定する。
# -*- coding: utf-8 -*-
## Proxy 経由で外部の Web server にアクセスする
import urllib2

url = 'http://www.google.com/'

# Proxy 設定
proxies = {'http': 'http://hogehoge:8080'}
proxyHandler = urllib2.ProxyHandler(proxies)
opener = urllib2.build_opener(proxyHandler)
urllib2.install_opener(opener)
f = urllib2.urlopen(url)
data = f.read()

# 受信結果を表示
print data

[Python][HTTP]HTTP 通信初歩

urllib2 モジュールを使って HTTP 通信をする。
# -*- coding: utf-8 -*-
## ローカルの Web server にアクセスする
import urllib2

url = 'http://localhost/'
f = urllib2.urlopen(url)
data = f.read()

# 受信結果を表示
print data

[Python][gnuplot]SQL データからグラフを作る

次のような SQL データからグラフを作る
2010 年 9 月平均気温
areatemperature
Tokyo25.1
Abashiri17.8
Naha28.0
# -*- coding:utf-8 -*-
from numpy import *
import Gnuplot, Gnuplot.funcutils
import os
import time
import MySQLdb

########################################################################
# @brief グラフを描く
########################################################################
def drawGraph(filename, pngfile, xmin, xmax, ymin, ymax):
 g = Gnuplot.Gnuplot(debug=1) # debug=1 を引数に付けるとコンソールに gnuplot に渡したコマンドが表示される

 # Gnuplot に指示を与える
 g('set xrange [%d:%d]' % (xmin, xmax))
 g('set yrange [%d:%d]' % (ymin, ymax))
 g('set boxwidth 0.5 relative')
 g('set style fill solid 0.2')
 g('set grid')
 g('unset key') # 凡例なし

 # データ読み込み
 str = "'%s' using 2:xticlabels(1) with boxes" % (filename)
 g.plot(str)

 # こちらでも png 出力可能, 一瞬 window が表示される
 g.hardcopy(pngfile, terminal = 'png')

 # すぐに終了してしまうとデータ出力できないので 0.1 sec sleep
 time.sleep(0.1)

########################################################################
# @brief Main function
########################################################################
# temporary ディレクトリを current directory にする
os.environ['TEMP']="."

# DB に接続
db = MySQLdb.connect(user="username", passwd="password", db="test", charset="utf8")

# SELECT
db.query("SELECT `area`, `temperature` FROM `temperature`;")
result = db.store_result()

# データ格納
filename = 'data03.dat'
pngfile = 'date03.png'
f = open(filename, 'w')
num = result.num_rows()
for row in result.fetch_row(num):
str = "%s\t%.2f\n" % (row[0], row[1])

# print str
f.write(str)
f.close()

# グラフ作成
drawGraph(filename, pngfile, -1, 3, 0, 30)

[Python][gnuplot]Temporary file を使う

データファイル, plt ファイルを temporary file にする。
tempfile.mkstemp() を使う場合はユーザー責任でファイルを削除する必要がある。
# -*- coding:utf-8 -*-
import tempfile
import os

# データ作成
(fd, dataFilename) = tempfile.mkstemp()
print "Data tempfile name: %s" % (dataFilename)
f = os.fdopen(fd, 'w')

str = """
東京\t25.10
網走\t17.80
那覇\t28.00
"""

f.write(str)
f.close()

# plot データ作成
(fd, pltFilename) = tempfile.mkstemp()
print "Plot tempfile name: %s" % (pltFilename)
pngfile = "data06.png"
f = os.fdopen(fd, 'w')

str = """
set terminal png font "/usr/share/fonts/ipa-gothic/ipag.ttf,12"
set output '%s'
set title '各地の気温'
set xlabel '場所'
set ylabel '気温'
set xrange [-1:3]
set yrange [0:30]
set boxwidth 0.5 relative
set style fill solid 0.2
set grid
unset key
plot '%s' using 2:xticlabels(1) with boxes
""" % (pngfile, dataFilename)

f.write(str)
f.close()

# gnuplot コマンド実行
os.system("gnuplot %s" % pltFilename)

# ファイル削除
os.remove(dataFilename)
os.remove(pltFilename)

[Python][gnuplot]日本語を使う

フォントを指定して日本語表示できるようにする。
data05.dat
東京 25.10
網走 17.80
那覇 28.00
set terminal png のところで IPA Gothic フォントを指定する。
# -*- coding:utf-8 -*-
import os

filename = "data05.plt"
f = open(filename, 'w')

str = """
set terminal png font "/usr/share/fonts/ipa-gothic/ipag.ttf,12"\n
set output 'data05.png'\n
set title '各地の気温'\n
set xlabel '場所'\n
set ylabel '気温'\n
set xrange [-1:3]\n
set yrange [0:30]\n
set boxwidth 0.5 relative\n
set style fill solid 0.2\n
set grid\n
unset key\n
plot 'data05.dat' using 2:xticlabels(1) with boxes\n
"""

f.write(str)
f.close()
os.system("gnuplot %s" % filename)

[Python][gnuplot]Gnuplot 用 plt ファイルを作成して実行

plt ファイルを python で書き出しおいて gnuplot コマンドを実行する。
# -*- coding:utf-8 -*-
import os

filename = "data04.plt"
f = open(filename, 'w')
str = """
set terminal png\n
set output 'data04.png'\n
plot 'data04.dat' using 1:2 with linespoints\n
"""
f.write(str)
f.close()
os.system("gnuplot %s" % filename)

[Python][gnuplot]外部データから読み込んで plot する

# -*- coding:utf-8 -*-
from numpy import *
import Gnuplot, Gnuplot.funcutils
import os
import time

# temporary ディレクトリを current directory にする
os.environ['TEMP']="."

# debug=1 を引数に付けるとコンソールに gnuplot に渡したコマンドが表示される
g = Gnuplot.Gnuplot(debug=1)
g.title('A simple example')

# Gnuplot に指示を与える
g('set boxwidth 0.9 relative')
g('set style fill solid 1.0')
g('set style data boxes')
g('set xdata time')
g('set timefmt "%Y-%m-%d"')

# データ読み込み
g.plot('"sample01.dat" using 1:2')

# こちらでも png 出力可能, 一瞬 window が表示される
g.hardcopy('sample01.png', terminal = 'png')

# すぐに終了してしまうとデータ出力できないので 1sec sleep
time.sleep(1)cmd.append('"%s"' % (font,))
sample01.dat
2010-10-01 1.1
2010-10-02 5.8
2010-10-03 3.3
2010-10-04 4.2

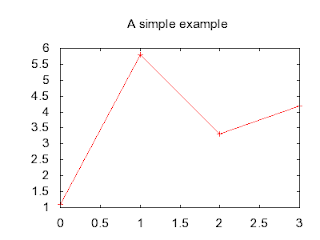
[Python][gnuplot]png ファイルにグラフ出力

# -*- coding:utf-8 -*-
from numpy import *
import Gnuplot, Gnuplot.funcutils
import os
import time

# temporary ディレクトリを current directory にする
os.environ['TEMP']="."

# debug=1 を引数に付けるとコンソールに gnuplot に渡したコマンドが表示される
g = Gnuplot.Gnuplot(debug=1)
g.title('A simple example')

# PNG ファイルに出力する場合は以下の 2 行を追加する
g('set term png size 400,300')
g("set output 'sample00.png'")

# Gnuplot に指示を与える
g('set data style linespoints') # give gnuplot an arbitrary command

# Plot
g.plot([[0,1.1], [1,5.8], [2,3.3], [3,4.2]])

# こちらでも png 出力可能, 一瞬 window が表示される
#g.hardcopy('sample00.png', terminal = 'png')
# Window 表示の場合は下記を有効にしてスクリプトを止める
#raw_input('Please press return to continue...\n')
# すぐに終了してしまうとデータ出力できないので 1sec sleep
time.sleep(1)

[Python][gnuplot]イ ンストール

  1. Numerical Python | Download Numerical Python software for free at SourceForge.net から Numerical Python (numpy-1.5.1rc1-win32-superpack-python2.5.exe) をダウンロードし、インストールする。
  2. Gnuplot.py - Browse Files at SourceForge.net から Gnuplot.py (gnuplot-py-1.8.zip) をダウンロードする。
  3. ダウンロードしたファイルを展開し、ディレクトリに移動してインストールを実行する。
    > python setup.py install
    
  4. pgnuplot.exe が実行できるように PATH を通す。
  5. 動作確認
    > python demo.py
    

[Python][XML]lxml - インストール

Windows
  1. Python Package Index: lxml 2.3 から Python 2.7 用パッケージ (lxml-2.3.win32-py2.7.exe) をダウンロードする
  2. ダウンロードしたファイルを実行する
動作確認
# -*- coding:utf-8 -*-
import lxml.etree
tree = lxml.etree.parse('test01.xml')
root = tree.getroot()
print root.tag
foods = root.iterfind('food')
print foods
for food in foods:
print food
children = food.getchildren()
for c in children:
print c.tag
name = food.find('name')
print "tag: ", name.tag
print "text: ", name.text
実行結果
> python test03.py
root.tag: breakfast_menu
foods: <generator object select at 0x00EAA8F0>
food: <Element food at 0xeaa940>
child.tag: name
child.tag: price
child.tag: description
child.tag: calories
tag: name
text: Belgian Waffles
food: <Element food at 0xeaa8a0>
child.tag: name
child.tag: price
child.tag: description
child.tag: calories
tag: name
text: Strawberry Belgian Waffles
food: <Element food at 0xeaaa08>
child.tag: name
child.tag: price
child.tag: description
child.tag: calories
tag: name
text: Berry-Berry Belgian Waffles
food: <Element food at 0xeaa918>
child.tag: name
child.tag: price
child.tag: description
child.tag: calories
tag: name
text: French Toast
food: <Element food at 0xeaa940>
child.tag: name
child.tag: price
child.tag: description
child.tag: calories
tag: name
text: Homestyle Breakfast

[Python][XML]xml.dom.minidom - Node のデータ表示

各 Node のデータを順番に表示する
test02.py
# -*- coding:utf-8 -*-
import xml.dom.minidom

# Node のデータを表示する
def dispNodeData(node, tag):
l = node.getElementsByTagName(tag)
for n in l:
 print n.nodeName, " - ", n.childNodes.item(0).nodeValue

# Main function
dom = xml.dom.minidom.parse('test01.xml')
foods = dom.getElementsByTagName('food')
for food in foods:
 print "nodeName: ", food.nodeName
 dispNodeData(food, 'name')
 dispNodeData(food, 'price')
 dispNodeData(food, 'calories')
実行結果
> python test02.py
nodeName: food
name - Belgian Waffles
price - $5.95
calories - 650
nodeName: food
name - Strawberry Belgian Waffles
price - $7.95
calories - 900
nodeName: food
name - Berry-Berry Belgian Waffles
price - $8.95
calories - 900
nodeName: food
name - French Toast
price - $4.50
calories - 600
nodeName: food
name - Homestyle Breakfast
price - $6.95
calories - 950

[Python][XML]xml.dom.minidom

XML を解析するには minidom を使う
test01.xml
<?xml version="1.0" encoding="utf-8"?>
<breakfast_menu>
  <food id="0">
    <name>Belgian Waffles</name>
    <price>$5.95</price>
    <description>two of our famous Belgian Waffles with plenty of real maple syrup</description>
    <calories>650</calories>
  </food>
  <food id="1">
    <name>Strawberry Belgian Waffles</name>
    <price>$7.95</price>
    <description>light Belgian waffles covered with strawberries and whipped cream</description>
    <calories>900</calories>
  </food>
  <food id="2">
    <name>Berry-Berry Belgian Waffles</name>
    <price>$8.95</price>
    <description>light Belgian waffles covered with an assortment of fresh berries and whipped cream</description>
    <calories>900</calories>
  </food>
  <food id="3">
    <name>French Toast</name>
    <price>$4.50</price>
    <description>thick slices made from our homemade sourdough bread</description>
    <calories>600</calories>
  </food>
  <food id="4">
    <name>Homestyle Breakfast</name>
    <price>$6.95</price>
    <description>two eggs, bacon or sausage, toast, and our ever-popular hash browns</description>
    <calories>950</calories>
  </food>
</breakfast_menu>
test01.py
# -*- coding:utf-8 -*-
import xml.dom.minidom
import pprint
dom = xml.dom.minidom.parse('test01.xml')
pprint.pprint(dom)

# NodeList
foods = dom.getElementsByTagName('food')
print "NodeList(food)"
pprint.pprint(foods)
print "length: %s" % (foods.length)

# Node
food = foods.item(0)
pprint.pprint(food)
print "Node(food)"
print "nodeType: ", food.nodeType
print "nodeName: ", food.nodeName
print "hasChildNodes(): ", food.hasChildNodes()
print "hasAttributes(): ", food.hasAttributes()

# NodeList
names = food.getElementsByTagName('name')
print "NodeList(name)"
pprint.pprint(names)
print "length: ", names.length
name = names.item(0)
print "Node(name)"
pprint.pprint(names)
print "nodeType: ", name.nodeType
print "nodeName: ", name.nodeName
print "nodeValue: ", name.nodeValue
print "hasChildNodes(): ", name.hasChildNodes()
print "hasAttributes(): ", name.hasAttributes()

# NodeList
nameDatas = name.childNodes
print "NodeList(data)"
pprint.pprint(nameDatas)
print "length: ", nameDatas.length

# Node
data = nameDatas.item(0)
print "Text Node(data)"
pprint.pprint(data)
print "nodeType: ", data.nodeType
print "nodeName: ", data.nodeName
print "nodeValue: ", data.nodeValue
print "data: ", data.data

# nodeType 定数
print "nodeType constants"
node = xml.dom.Node
print " ELEMENT_NODE : ", node.ELEMENT_NODE
print " ATTRIBUTE_NODE : ", node.ATTRIBUTE_NODE
print " TEXT_NODE : ", node.TEXT_NODE
print " CDATA_SECTION_NODE : ", node.CDATA_SECTION_NODE
print " ENTITY_NODE : ", node.ENTITY_NODE
print " PROCESSING_INSTRUCTION_NODE: ", node.PROCESSING_INSTRUCTION_NODE
print " COMMENT_NODE : ", node.COMMENT_NODE
print " DOCUMENT_NODE : ", node.DOCUMENT_NODE
print " DOCUMENT_TYPE_NODE : ", node.DOCUMENT_TYPE_NODE
print " NOTATION_NODE : ", node.NOTATION_NODE
実行結果
> python test01.py
<xml.dom.minidom.Document instance at 0x00B402D8>
NodeList(food)
[<DOM Element: food at 0xb45418>,
<DOM Element: food at 0xb457d8>,
<DOM Element: food at 0xb45b98>,
<DOM Element: food at 0xb45f58>,
<DOM Element: food at 0xb4b350>]
length: 5
<DOM Element: food at 0xb45418>
Node(food)
nodeType: 1
nodeName: food
hasChildNodes(): True
hasAttributes(): True
NodeList(name)
[<DOM Element: name at 0xb45530>]
length: 1
Node(name)
[<DOM Element: name at 0xb45530>]
nodeType: 1
nodeName: name
nodeValue: None
hasChildNodes(): True
hasAttributes(): False
NodeList(data)
[<DOM Text node "u'Belgian Wa'...">]
length: 1
Text Node(data)
<DOM Text node "u'Belgian Wa'...">
nodeType: 3
nodeName: #text
nodeValue: Belgian Waffles
data: Belgian Waffles
nodeType constants
ELEMENT_NODE : 1
ATTRIBUTE_NODE : 2
TEXT_NODE : 3
CDATA_SECTION_NODE : 4
ENTITY_NODE : 6
PROCESSING_INSTRUCTION_NODE: 7
COMMENT_NODE : 8
DOCUMENT_NODE : 9
DOCUMENT_TYPE_NODE : 10
NOTATION_NODE : 12